

Extending Glyphs
It is easy to extend Glyphs: tap into the realm of existing scripts and plug-ins, or even write your own extension. It’s easier than you may think.
Basically there are two ways of extending the functionality of Glyphs: with scripts and with plug-ins. Both may require additional installations called modules. So let’s first get our Glyphs prepared, so you can extend it any way you want it. Don’t worry, this part you only have to do once.
Modules
Go to Window > Plugin Manager to open the Plugin Manager. This is the place where we install and uninstall all our extensions. Many scripts require Vanilla and pretty much all extensions need Python 3, so I would definitely recommend to install those:

While you are at it, you can also install the other modules listed there. True, relatively few extensions need FontTools and RoboFab, but it doesn’t hurt to have them, and what’s done is done.
Preferences
In Glyphs > Preferences > Addons, go to Python version pop-up menu, and make sure a Python version marked ‘(Glyphs)’ is selected:

In any event, after installation of any of these modules and setting the preferences, we recommend to restart the app, so all changes can take effect.
Scripts
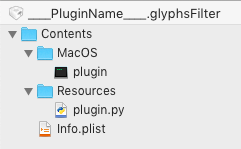
Typically, scripts are small pieces of Python code that do one or two particular things well. They are stored in text files with a .py ending in a special folder called Scripts inside of Glyphs’ Applications Support folder, somewhere deep in the guts of the macOS Library. Glyphs will load and display all scripts in the Script menu. The submenus in that menu replicate the subfolder structure of that Scripts folder.
Scripts are quick and easy to write. Even if you have never coded before, you can learn basic scripting in one afternoon. They are also easy to install and their installation does not require a restart of the app.
Installing scripts: Plugin Manager
There are two ways of installing scripts. First, with an easy one-click install through Window > Plugin Manager > Scripts. Just browse through the available script collections, and pick the ones you want:

After that, you can reload the Script menu by holding down the Option key and simultaneously choosing Script > Reload Scripts (Cmd-Opt-Shift-Y). And voilà: next time you open the Script menu, the newly installed script collection is available already:

Here is the takeaway: script collections installed through the Plugin Manager (as described above) are kept up to date automatically. Every time you start Glyphs, and your Mac is connected to the internet, it will check if you have the latest version and update your installation if you haven’t done that already.
Manually installing scripts
The second way of installing scripts is by manually placing them inside the Scripts folder. The quickest way to access that folder, you guessed it, is to run Script > Open Scripts Folder (Cmd-Shift-Y). You can organize script files in subfolders, which will appear as submenus in the Script menu. Once you are done, do not forget to hold down the Option key again and choose Script > Reload Scripts (Cmd-Opt-Shift-Y).
Needless to say, manually installed scripts cannot be kept up to date automatically. Instead, you will have to manage them yourself.
Running scripts
Run scripts by simply choosing them from the Script menu. If you are not sure what a script does, hold your mouse over its menu entry for a second, and a tooltip will appear, describing what the script will do:

If it looks like the script has not done anything, the script may have run into an error. In that case, look in the Macro Window (Window > Macro Panel, Cmd-Opt-M) for error messages. They may give you a clue as to what went wrong. If you find a message that says something like this:
ModuleNotFoundError: No module named 'vanilla'… the script requires something called a module. See the section called ‘Modules’ further above.
Plug-ins
With plug-ins, coders can dig deeper into the ecosystem of Glyphs, and do more advanced stuff. Though most plug-ins will show up in Filter and View, they can appear in any menu or even show up as palette in the right sidebar. Plug-ins are a bit more challenging to make still no biggie though, and different from scripts, they require a restart after installation or update.
Installing plug-ins through the Plugin Manager
Similar to scripts, you can install plug-ins with a single click in Window > Plugin Manager. Simply pick the Plugins section, browse through the plug-ins, and click on the Install button to install it. Or, if it is already installed, click on the Remove button to, well, you guessed it: remove it. That’s it.
Manually installing plug-ins
Commercial third-party plug-ins like Tim Ahrens’ essential RMX Tools (a.k.a. ‘Font Remix Tools’), the amazing LetterInk, or Makkuk’s LayerWhale for recording your design process, or one of Mark Frömberg’s many cool plug-ins: they come with their own instructions. Usually, you can simply double click the plug-in file, and Glyphs will ask you if you want to install it:

Simply confirm the dialog by pressing Install, then restart the app, and the plug-in will be active and available. You can find a selection of third-party plug-ins on the Resources page.
Show your love
Like a script or plug-in? Why not treat the developer to a coffee?
Almost all of the scripts and plug-ins in the Plugin Manager are available for free. Some developers, however, have donation links next to the URLs of their most popular items in the Plugin Manager. A click on the icon takes you to their micropayment page:

Consider how much better an extension made your life and show your appreciation. 💝
Advanced options
There are more ways to customize your experience of extending Glyphs, especially if you need to manage foundry-specific installations. In any event, this chapter is for specific environments and advanced Terminal acrobats only. So do not worry if the following does not make any sense to you, because it probably does not apply to you.
Your own Python 3 installation
You can install your own Python 3 with the download from Python.org (look for the Mac Universal installer), or if you are one of those people, brew your own Python 3 installation. Either way, you can use it within Glyphs. Simply pick your home-made Python from the pop-up menu in Glyphs > Preferences > Addons > Python:

Then restart Glyphs, and you are all set.
Wait, not quite. There actually is one more thing. If you use a different Python than the one offered to you in Plugin Manager, you are lacking an additional Python module called pyobjc. Try this in Terminal:
pip3 install pyobjcIf using pip3 gives you an error, you may need to make sure you have the Python package manager ‘pip’ installed properly. Assuming you have Python 3 installed, try this:
python3 -m ensurepip --upgradeAnd once pip installed, you can keep it up to date by occasionally running:
pip3 install --upgrade pipIf it still does not work, and you are about give up on pip: hold on, there is another trick. You can replace pip3 with python3 -m pip in the commandline. So the line further above would read:
python3 -m pip install pyobjcWhatever your mileage was, now it should work. You may need to restart the app once more. For some additional advanced installations, see below.
Your own Plugin Manager content
Let’s say your foundry has custom scripts, plug-ins, and/or modules that need to be made available to everyone in the company. You have two options: either you publish them under an open-source license on GitHub and let us know about it. Then we will add them to our Glyphs Packages repository on GitHub, and a minute later, they are part of the Plugin Manager.
Or, especially if it is proprietary or top-secret code that cannot be published, you can set up your own packages list! It is easy: Go to Glyphs > Preferences > Addons again, and in the Alternate Plugin Repos field, add the URL for a publicly reachable .plist file that contains the scripts, plug-ins and modules you want to distribute to your co-workers.
All you need to do is set up and maintain that .plist file, and make your colleagues enter that URL in that field in Glyphs > Preferences > Addons. That’s it. Next time they open Window > Plugin Manager, they can access the additional extensions.
Your own scripts and plug-ins
Have not found that script or plug-in that fits your project? Why not write your own?
In case you have not coded before, let me tell you that Python is a great first scripting language. You can get started in an afternoon or two. No kidding. Read through the Scripting Glyphs tutorials. The first three are super-easy. After that, admittedly, it does get a little challenging. But you know what, others have done it before, and once you get the hang of it, it is hard to stop.
Once you are ready, you can continue with writing plug-ins. That will take you one step further, and you’ll feel so much more powerful.
Advanced font production
If you know what you are doing, you can install some more modules through pip. Here, for your copy-and-paste convenience, all the font production installations at once, assuming you need them in your own Python installation. If you install all the modules, and use the Python provided in Plugin Manager, you already have them all, except afdko.
pip3 install fonttools --upgrade
pip3 install brotli --upgrade
pip3 install zopfli --upgrade
pip3 install fontbakery --upgrade
pip3 install afdko --upgrade
pip3 install cocoa-vanilla --upgrade
Or, in case you cannot (or do not want to) use pip3 directly, try the python3 route (see above):
python3 -m pip install fonttools --upgrade
python3 -m pip install brotli --upgrade
python3 -m pip install zopfli --upgrade
python3 -m pip install fontbakery --upgrade
python3 -m pip install afdko --upgrade
python3 -m pip install cocoa-vanilla
This will give your Python installation the latest versions of fontTools, Font Bakery, and AFDKO, as well as the brotli and zopfli compressions for webfont (WOFF and WOFF2) exports. And Tal Leming’s vanilla, just in case.
Troubleshooting
Sometimes installing the modules will not work, and you cannot make the extensions work. Here are a few things that you can try if that happens to you.
Python does not install
You tried again and again, but in Glyphs > Preferences > Addons > Python version, you cannot pick the Python provided by Glyphs. Perhaps, Window > Plugin Manager > Modules even shows Python as installed. What is going on?
What probably happened is that the download of Python began as planned, which caused Plugin Manager to register it as installed. But then the download hit a wall, was slowed down, or was interrupted. Anything can be the cause of that, a bad connection, a timeout, or you restarted the app a second too soon. Here is how you can make sure it installs:
- Run Script > Open Scripts Folder to access the Application Support folder of Glyphs.
- In the folder that opens in Finder, navigate to Repositories → GlyphsPythonPlugin, and keep this folder open during the following steps.
- In Glyphs, go to Window > Plugin Manager > Modules, remove and reinstall the Python module.
- Wait a little bit (should not take longer than a minute) and watch the GlyphsPythonPlugin folder from step 2. If nothing happens, repeat step 3.
- When you see the following contents in your GlyphsPythonPlugin folder, you can restart the app: build.py, dist (folder), GlyphsPythonModul.py, Python.framework (folder), setup.py. It will look something like this:

- Now go to Glyphs > Preferences > Addons, and choose the Python version that has the word ‘Glyphs’ in parentheses.

‘Plugins crashed’ error
When you restart Glyphs, you get this error message: ‘The last time Glyphs was started, the following plugins crashed.’ This is followed by the advice to ‘remove and reinstall’ the plug-ins, and a list of plug-ins that were not loaded:

Now, the dialog pretends to give you a choice, but you really do not have one. The Remove button will indeed delete these plug-ins from your installation, and you can go into Window > Plugin Manager and spend some time browsing and reinstalling plug-ins. If you press OK, you may think you can just go on, but what happens is that the plug-ins are quarantined and not loaded anymore until you really remove them.
Chances are your plug-ins are fine, and really, just one of the modules did not load, but the poor plug-ins get blamed. The problem is, the plug-ins stay quarantined forever after. Here is how you circumvent the problem:
- In Window > Plugin Manager, remove and reinstall all Modules. Give it a minute or two.
- In Window > Macro Panel, select all, paste the following code, and click the button Run:
Glyphs.defaults['DebugMode'] = 1 - Restart the app.
You may need to repeat steps 2 and 3 if you get an error message in the lower half of the Macro Panel. What the Debug Mode does is it ignores all quarantine restrictions for plug-ins and simply loads them all as if nothing had happened.
If you cannot get step 2 to work at all, open Terminal.app, paste the following code:
defaults write com.GeorgSeifert.Glyphs3 DebugMode 1… and press the Return key or the Enter key, and you are done. It should look something like this:

Useful links
Glyphs team member Florian Pircher keeps a newsfeed for Glyphs plug-ins on his website. It tracks the git commits of the plug-in repositories on GitHub. Florian also maintains the Scripts Index, where you can search the titles and help texts for all scripts available through Plugin Manager.
Update 2020-10-20: completed unfinished sentences (thanks Nathalie).
Update 2020-12-20: added note about Python M1 chips.
Update 2021-01-15: added update to that note.
Update 2022-02-10: added Troubleshooting chapter.
Update 2022-07-10: added note about PyObjC 8.4 vs. 8.5.
Update 2022-08-01: related articles, minor formatting.
Update 2022-08-04: refined the pyobjc argument in the pip commands.
Update 2022-08-07: minor header formatting, updated a screenshot.
Update 2023-06-06: added Useful links.
Update 2023-08-18: rewrote Your own Python 3 installation and added Advanced font production.
Update 2024-01-17: added vanilla to the pip3 installs.