

Writing plug-ins
Plug-ins offer additional features to software applications, usually provided by third parties. This overview covers plug-in development for Glyphs 2.3 or later. Don’t be shy, grab a cup of great coffee, and relax: Others have done it before you.
Plug-ins provide additional features to software applications, usually provided by third parties. This tutorial provides you with an overview of how to go about plug-in development. You will find detailed descriptions in the Readme.md files on our GlyphsSDK repository.
Don’t be shy, grab a cup of great coffee, and relax: Others have done it before you.
Step 1 Get your plug-in template
We’re providing plug-in skeletons for various purposes (such as for file export, custom outline filters etc.) on our GitHub page. If you’re already familiar with Git, you may check out the folder structure in your favourite versioning app (Git’s own, or one of the many other apps available). Although being a Subversion client, Versions.app is the recommendation of this tutorial’s author).
If you’re too unfamiliar with the concept of code-versioning, even if it is just as a subscriber to someone else’s code, you can also simply download a ZIP file containing the entire Glyphs SDK (Software Development Kit) from the Glyphs SDK main page.
So, our SDK page is here: https://github.com/schriftgestalt/GlyphsSDK/tree/Glyphs3, and the plug-in templates are in a sub-folder called Python Templates. There you will find plug-in skeletons that are waiting to be brought to life by you. Each of these plug-in templates contains fully functional sample code for better understanding.
- File format: Exporting your own font formats
- Filter without dialog: Change the font through a Filter menu or upon export
- Filter with dialog: Same as above, with the use of a user interface dialog
- General plug-in: No special purpose. We’ll see what happens
- Palette: Add a palette view to the side bar
- Reporter: Draw into the Edit view and Preview to illustrate features of your glyphs
- Select Tool: Enhance the Select Tool with your own features
For Glyphs.app, plug-ins come in the form of the Mac’s so-called packages, and they need to be put into Glyphs’ Plugins folder located at ~/Library/Application Support/Glyphs/Plugins (~ stands for your user account’s home folder). Glyphs will put it there automatically if you open it by either dragging it on the app icon or double-clicking it. These packages look and behave like single files in the Finder, but they’re in fact folders, whose content you can access by right-clicking on such a package in the Finder and choosing Show package content.
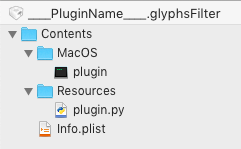
This is how such a plug-in’s folder structure would look like. Your main code goes into the Contents/Resources/plugins.py file. Other noteworthy files are the Info.plist which holds various information about the plug-in and, in plugins with a dialog, the two .nib/.xib files that contain a user interface dialog view.

Many contemporary text editors will also open a whole folder at once, providing you with a tree view of files to edit in a side panel. So you can open the whole .glyphsFilter file package in your text editor at once:

Currently, the most popular text editors for this purpose are TextMate, SublimeText, Visual Studio Code, and Atom.
Step 2 Rename some ____Names____
The Python Templates page in our GitHub repository contains detailed information about how to set up the file structure in the plug-in. You will have to rename everything that contains quadruple underscores (such as ____PluginClassName____) in up to three of the files.
For the plug-in name, we are dealing with two different name variations:
____PluginName____is a human-readable name that will show up in places such as the Plugins tab of Glyphs’ Preferences window. This name may contain spaces and Unicode characters.____PluginClassName____is the machine-readable name of the Python class in your code and needs to be put into a few places. It needs to be unique. You can’t install two plug-ins next to each other that have the same class name. Although I wrote ‘machine-readable’, there is one interaction where the user of the plug-in will get to see this class name: calling filters through Custom Parameters upon file export. So make it a friendly and unique name. Only ASCII characters and no spaces allowed here. We recommendcamelCaseNames.
A section in the Info.plist tells Glyphs where it finds updates to your plug-in, so it can notify users when their plug-in becomes outdated. For that to work, you need to put in a URL to an online Info.plist that contains the current version number. This could be a manually edited file, or it could be an automatically generated file, such as from an online shop, or it can be the very same Info.plist inside the downloadable plug-in.
In case you are using GitHub for distributing, the deep link to your Info.plist will be: https://raw.githubusercontent.com/*user*/*plugin*/master/*filename*/Contents/Info.plist. Replace *user* with your GitHub username, *plugin* with the name of the GitHub repository, and *filename* with the name of your plugin including its suffix, e.g., MyPlugin.glyphsFilter.
Now is a good time to read the details on the Python Templates page.
Step 3 Dialogs with interface builder
Some plug-in types can open a dialog inside Glyphs.app:

Like all of the Glyphs application, we use Apple’s own Cocoa for creating dialogs, specifically the Interface Builder. For this, you need to install Apple’s Xcode, available free of charge in the AppStore. If you don’t have it yet, now would be a good time to find a high-speed internet connection, and start the download. It clocks in at a hefty four gigabytes.
In case you want to use Tal Leming’s Vanilla library instead, you will find useful information in the Readme files of all plug-ins with dialogs.
Your Python code and the Cocoa user interface communicate with each other using IBOutlets (your code talks to the user interface) and IBActions (the user interface talks to your code).
They get defined in the Python code as follows. IBOutlets are defined as class variables like this:
class CSVFileExport (FileFormatPlugin):
    textField = objc.IBOutlet() # A text field in the user interface
And IBActions are class methods, prefixed with @objc.IBAction:
    @objc.IBAction
    def buttonClicked_(self, sender):
        # do stuff when the button has been clicked
And this is what it is going to look like when you create a dialog in Xcode’s Interface Builder:

All necessary details are described on the Python Templates page. Go through the step-by-step guides, and you can cross the bridge when you get there.
Step 4 Step-by-step guides
How to deal with each plug-in is described in detail on the respective plug-in’s Github page:
Step 5 Plugin manager
Once you’re done, you can make your plug-in available for easy installation via Window > Plugin Manager. Follow the instructions on the Glyphs Packages git repository, add the lines necessary for your plug-in, and make the pull request.
Careful: there are branches in the repository for different versions of Glyphs. In the master branch, the Plugin Manager contents for Glyphs 2.x are stored, in the glyphs3 branch, you can add content for Glyphs 3.
Congratulations
And that’s it! This should do to get you started with your Glyphs plug-in. If you get stuck somewhere, please feel free to ask questions on our Forum.
Written by Jan Gerner (Yanone), edited by Rainer Erich Scheichelbauer and Rafał Buchner.
Update 2020-12-15: updated for Glyphs 3.
Update 2018-11-18: corrected minor typos.
Update 2020-12-14: updated Plugin Manager section.
Update 2022-08-01: updated title, related articles, minor formatting.