Importing from Illustrator
So you have made those great designs in Adobe Illustrator and you want to turn them into a font. Find out how to best use them into Glyphs.
When people ask me how to get their Illustrator drawings into Glyphs, my first reaction usually is, ‘Don’t!’ Illustrator’s drawing tools may be sufficient for the average illustration, but in fonts, we usually need better curve quality than Illustrator can provide. And the tools in Glyphs do help you achieve a higher outline quality, especially when it comes to curved segments. I covered the details in a tutorial. So do consider redrawing your design in Glyphs. It may be less work than importing the paths and cleaning them up afterwards.
Coordinate precision
In File > Font Info > Other, you’ll find a Grid Spacing value. If your Grid Spacing is not zero, all your coordinates will be rounded by your Grid Spacing value. If, however, you set your Grid Spacing to zero, Glyphs will use floating point coordinates, and practically no rounding will occur. So, if you plan a lot of transformations after import, or if your drawings have very, very fine details, then set your Grid Spacing to zero. Otherwise, you usually want to keep it at one.
Scale: 1 point = 1 unit
One point in Illustrator corresponds to one unit in Glyphs. By default, one unit is a thousandth of an em. Or more precisely, whatever you have set your UPM (units per em) value to in the Font Info (Cmd-I). A full em is whatever you set your font size to later on.
This means that, by default, your Illustrator drawings are most likely too small. An average x-height is half an em, i.e. 500 units. And 500 units translate to 500 points in Illustrator. That’s approximately 17.6 centimeters (almost 7 inches), just for the x-height!
It’s a good idea to already scale your drawings in Illustrator. This keeps rounding errors at later stages to a minimum, especially if your Grid Spacing (see above) is not zero. For that purpose, you may want to set your measurement units to points. You can do that by right-clicking the rulers at the edges of the window or by changing your settings in Illustrator’s application preferences.
Copy and paste
Now, all you need to do is copy and paste your vector drawings from Illustrator into Glyphs. Make sure you copy only closed paths and make sure you have the right glyph activated when you paste.
There’s one problem though. Illustrator uses one coordinate system for the whole canvas, whereas the coordinates in a font work on a per-glyph basis. Glyphs will recognize coordinates that are way off and ask you if you really want that object placed out of the glyph bounds. In 99.9 percent of the cases, you want to Correct Bounds:
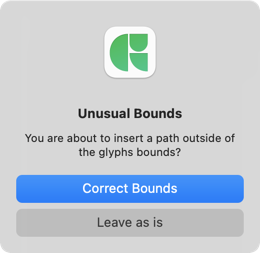
Glyphs will then align the pasted drawing either to the baseline or the left sidebearing of the current glyph, or to both, whatever is necessary to bring it back into the glyph bounds. But this may mess up things like overshoots or descenders. Turns out there’s a better way to do that.
Take control of positioning
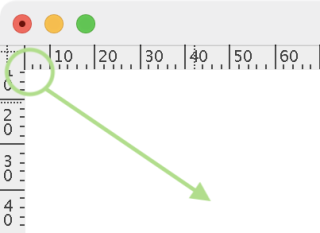
In Illustrator up to version CS4, you can set an origin point by dragging the crosshair from the tiny area in the top-left corner of the window where the vertical and horizontal rulers meet. Glyphs will respect the position of the origin when you paste. Illustrator’s origin corresponds to a glyph’s x=0/y=0 point, i.e. where left sidebearing and baseline intersect.
In Illustrator CS5 and above, you need to set that origin in the artboard options. Bring up your artboard palette, and pick Options from the palette menu, or double-click the artboard symbol, or double-click the artboard tool in the toolbar. You can, for instance, set the height of your artboard to 500pt and its origin to the bottom left corner:
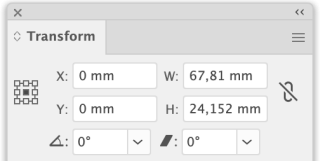
Then you can scale and reposition your letters or symbols like this:

Now, if you’re a real geek, you can place equally sized boxes around each object and have an Illustrator action scale them up to the right size and position, remove the box and copy the object into the clipboard.
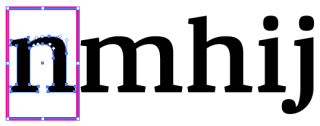
And what about the width of the glyph? After pasting, you can quickly fix right sidebearing by entering its value in the grey info box. Or, you can set them all at once by selecting your glyphs in the Font tab and then entering the metrics values in the info area in the bottom left of the window.
Cleaning up
As I mentioned in the beginning, there is much more to say about good paths, but here is a quick and easy way to correct the worst problems:
- In the Font tab, select all glyphs (Cmd-A).
- Choose Paths > Add Extremes. This will insert nodes at extreme positions of path segments. If you don’t know what that means, don’t worry, do it anyway.
- Choose Paths > Correct Path Direction (Cmd-Shift-R). This will fix your counters and the path order inside a glyph.
- Choose Paths > Tidy Up Paths (Cmd-Shift-T). This will remove superfluous nodes and doubled coordinates.
- Unless you need very high detail in your outlines, you may also want to choose Paths > Round Coordinates which will round all your coordinates to the nearest integer.
The point coordinates are not rounded to your Grid Spacing right after pasting. They get rounded only after the first transformation you apply to them. Via Path > Transformations, you can apply a small shift transformation to all glyphs at once and everything will snap to the grid. If you just want integer coordinates, the Paths > Round Coordinates command will suffice.
Want pixel perfection? Check out this blogpost then.
Once you have done that, you’re good to go. Have fun.
Update 2022-08-12: minor formatting.


