Adding glyphs to your font
There are quite a few ways of adding new glyphs to your font. Here is a pretty handy overview.
Adding from sidebar
Probably the best way to add new glyphs is through the lists and categories in the sidebar of the Font tab. Some of the categories, language entries and filters have number badges indicating how many glyphs of this group are already in the font, and how many glyphs there are in total. E.g., 8/24 means that there are 24 glyphs in this group, and 8 of them are already in the font:
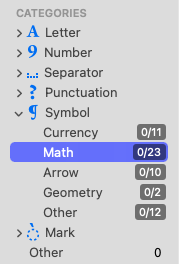
Right-click any of these number-badged entries, and you will be presented a list of glyph names of glyphs recorded in this group but still missing in the font. Select any glyph, or multiple glyphs (click and drag, or Shift- or Cmd-click multiple glyphs), or even all of them (Cmd-A). Then click the Generate button or press the Return key to add them to the font.
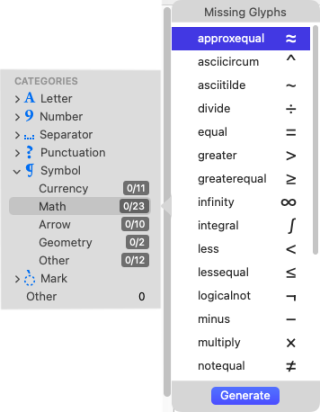
There are three kinds of groups: categories, languages, and filters.
- Categories such as letters, ligatures and figures, are mainly intended for narrowing down what is shown in the Font tab. Some of them have number badges and allow adding missing glyphs through right-clicking.
- Languages help you keep control over whether you have enough glyphs for covering certain languages, or actually language groups or even complete script systems. They often contain subgroups that make sense for technical or linguistic reasons. Almost all of the language groups have number badges.
- And at the bottom, there are customisable Filters. There are smart filters and list filters. The latter are simple lists of glyph names, and carry a number badge.
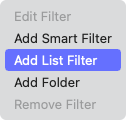
Categories and Languages are predefined, but you can add your own sidebar entries. List filters are easy to create: click on the actions menu in the bottom left, choose Add List Filter:
And in the upcoming dialog, pick a name for your list filter, and add glyph names, one per line:
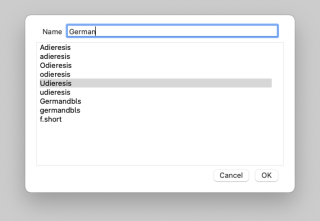
Glyphs will pre-fill the dialog with the names of the glyphs that you had selected. If you had selected any glyphs, of course. When you pick glyph names, make sure they are valid.
The common advantage of all these sidebar entries is that they are available in all Glyphs files. In other words, they help you create fonts with consistent glyph sets, or sync the glyph sets across multiple files.
Adding glyph variants
Alternate glyphs are supposed o carry the same name as the respective original glyphs, except for an additional dot suffix. Since glyph variants usually do not have a Unicode value assigned, and therefore cannot be typed, they have to be accessed through an OpenType feature, a stylistic set for instance. The dot suffix usually reflects the name of the OpenType feature. E.g., the first stylistic set variant of adieresis would be called adieresis.ss01.
A quick way to create glyph variants is to select one ore more glyphs, either in Edit or Font view, and then choose Glyph > Duplicate Glyph (Cmd-D). Glyphs will then create copies of the selected glyphs with a .001 suffix, or, if that suffix is already taken, .002, and so on. After their creation, the duplicate glyphs are selected automatically for further processing.
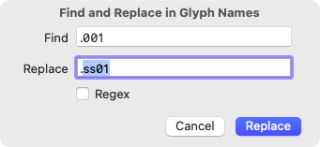
To quickly change the suffix of the new duplicate glyphs, keep the selection, and choose Edit > Find > Find and Replace… (Cmd-Shift-F). In the dialog search for the suffix of your duplicates, e.g., .001, and replace it with the intended suffix:
Read more about renaming many glyphs at once in the Batch renaming tutorial.
Add Glyphs dialog
When you choose Glyph > Add Glyphs … (Cmd-Shift-G), you are presented with a dialog containing a multi-purpose text entry field. In it, you can add any number of glyphs, in various ways:
- Pasted or typed characters (use spaces, newlines or tabs as separators):
Ä Ö Ü ä ö ü ẞ ß - Glyph names:
a.ss02 adieresis.ss02 aacute.ss02 - Unicode ranges with a colon:
a:zoruni0300:uni033F - Recipes:
y.alt+dotbelowcomb=ydotbeloworf.connect+f=f_f.liga
After you click on the Generate button, the respective glyphs will be added to their font, and their name will be converted to human-readable glyph names according to the built-in glyph database, a.k.a. nice names. This includes legacy or production glyph names such as uni0421 or dotlessi. If you want to prevent the name conversion, activate the setting File > Font Info > Other > Use Custom Naming (Cmd-I).

If you know the Unicode of the glyph you want to add, you can type uniXXXX for unicode values 0000 through FFFF, or uXXXXX for Unicode values 10000 and above.
Apart from being the only way for employing recipes, this method is ideal for covering Unicode ranges and glyph lists you take from elsewhere, but do not want to add permanently to the sidebar. Also, it is the quickest method if you know how to type certain letters, but do not know their glyph names.
Adding glyphs from Glyph Info
With Window > Glyph Info, you can take a glimpse at the built-in glyph database. Each entry lists glyph name, Unicode value, category and subcategory, its script, and its composition if applicable:
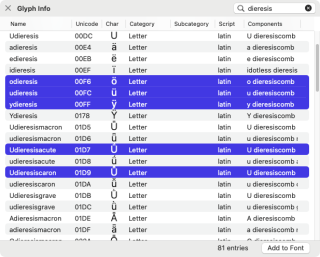
Use the search field for searching in glyph names, Unicode values or characters. Select one or more glyphs in the list (click and drag, or Shift or Cmd-click multiple entries), then push the Add to Font button. That’s it.
This way, you can access any glyph the app knows about, even if it is not listed anywhere in the sidebar. The Glyph Info window is also a quick method for finding all glyphs in the database belonging to a certain script, simply by typing the script extension, e.g., -deva.
If some or all of the glyphs you want to create are already in the font, Glyphs will ask you what you want to do:

The add button
For adding single glyphs, you can also press the little plus button at the bottom of the Font tab. Glyphs will add a glyph called newGlyph to the font. If you do not see anything at first, you may need to scroll down all the way to the Other category. Perhaps you also need to switch back to the All category.
The glyph name should already be selected, so you can type the desired glyph name right away. If you wait for a second, you will be offered autocomplete options:
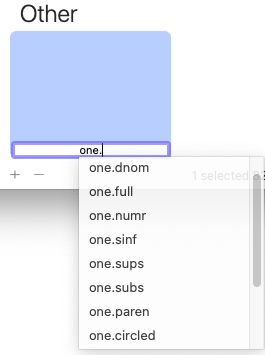
Similar to Glyph > Add Glyphs, the entry takes legacy glyph names or even plain character entries, and will convert them to proper nice names once you press the Return key.
Removing glyphs again
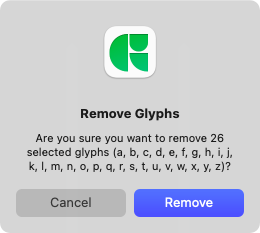
Unhappy with the glyphs you just added? In Font view, select them, and press the Remove button, the one withe minus located next to the Add button. Or, press Cmd-Delete to remove selected glyphs. The shortcut also works in Edit view. After you confirm the dialog that follows, you have gotten rid of the excess glyphs:
Scripting
For the scripters among you, you can easily create a glyph by instantiating the GSGlyph class, and appending the GSGlyph object to the glyphs of a GSFont object. Sounds complicated? Nah, here is a Python sample that should be self-explanatory:
myGlyph = GSGlyph()
myGlyph.name = "estimated"
myGlyph.unicode = "212E"
Glyphs.font.glyphs.append(myGlyph)
You can then proceed to access myGlyph’s layers, etc.
Alternatively, you can create a GSGlyph object with the name right away. So, you can replace the first two lines of the code sample with myGlyph = GSGlyph("estimated"). More info on this, and lots of other Python-related stuff, can be found on docu.glyphsapp.com.
The same thing in AppleScript would look like this:
tell application "Glyphs"
    tell font of first document
        make new glyph at the end of glyphs with properties {name:"estimated", unicode:"212E"}
    end tell
end tell
Have fun!
Update 2018-07-28: changed a misleading wording and added a missing word.
Update 2018-09-03: minor formatting fix.
Update 2021-11-10: minor formatting update.
Update 2022-16-08: new screenshots, added batch-renaming tutoriAL.
