Creating an SF Symbol
SF Symbols are a great way of adding adaptable icons to your Xcode projects. Here is how you make them in Glyphs.
This tutorial assumes that you have seen Apple’s SF Symbols presentation during WWDC 2019. If you have not done so yet, watch it now.
If you are a UI designer and working with Mac developers, they probably have seen that video already, and probably are aware of the SF Symbols Human Interface Guidelines by Apple. In case they’re not, pass them that link, please.
Downloads and Installations
To get started, you need Apple’s SF Symbols app (80MB disk image). Mount the image and double click the installer (the yellow package).
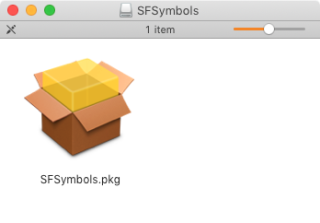
Follow the instructions that appear on the screen and the SF Symbols app will install into your Applications folder.
Create a Template
In the SF Symbols App, pick an icon. That’s hard because there are many. But, you can scroll through the icons in grid and list view, view them matching any of the system font styles with the font menus in the top left, and you can search for their names in the search field in the top right corner (see the video at 7:30). I for one, will pick the heart:
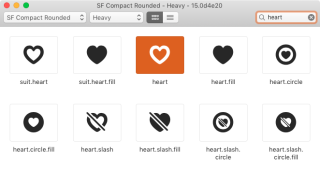
Select it by clicking on it once, then pick File > Export Custom Symbol Template (Cmd-E), and in the following dialog, leave the name as it is (heart.svg in my case), and export it in a location you find appropriate. I am lazy and will export it on the Desktop. The template itself is an especially structured SVG (see the video at 9:50), and will look something like this:

In the Apple video, you get to see how the designer has to manually draw (9×3=) 27 variations for the icon. Ugh. But hey, it looks like a 2-dimensional 4-master interpolation, doesn’t it? With Glyphs you can draw those masters instead, interpolate the rest, and perhaps insert a brace layer or two where you feel it’s necessary.
Import the Template
Now, switch back to Glyphs. You will find a menu item called File > Import > Symbol Template…:
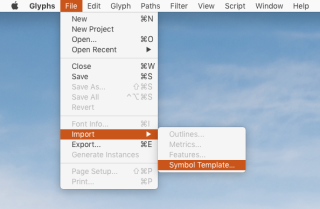
Point the Import dialog to the SVG you just saved, and confirm. Glyphs will parse the SVG and turn it into a .glyphs file with a single glyph for your icon:
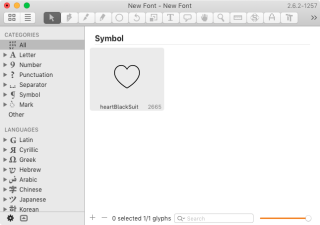
If the icon has a Unicode value assigned, it will have the nice name according to the internal glyph database. In any event, all you need to do now is make your edits, as you would in a multiple master font, just that it is only one glyph this time.
As you would expect, drawing an outline and post-processing it with Filter > Offset Paths and then with Filter > Round Corners or even Filter > Rounded Font is probably a good way to add drawings. I will make my heart smile:
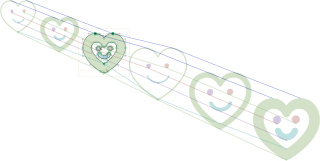
And of course, all niceties that Glyphs provides for multiple-master editing and keeping are at your disposal:
- Hold down the Opt key and choose Paths > Correct Path Direction for All Masters (Cmd-Opt-Shift-R) to reset start points on each outline and automatically reorder all shapes. This usually (re-)establishes layer compatibility.
- Filter > Shape Order for manually managing shape order across master and brace layers: drag shapes in the same order for each layer if Correct Path Direction does not do the trick.
- View > Show Master Compatibility (Ctrl-Opt-Cmd-N) to dig deeper and find that extra point on an outline that hinders compatibility. Select a node on a red outline, and step through nodes with the Tab key, and see how they connect through the masters.
- Palette sidebar (Cmd-Opt-P) with the Layers palette: manage layers, right-click a layer to reinterpolate it, and if you do not need one of the (indented) intermediate brace layers, simply select it and click the minus button.
- Many free plug-ins and Python script collections available through Window > Plugin Manager.
If this is your first foray into multiple-master outline editing, make sure you have read the three Multiple Master tutorials. And make sure you understand what those brace layers are all about.
Managing Precision: Brace Layers and the Grid
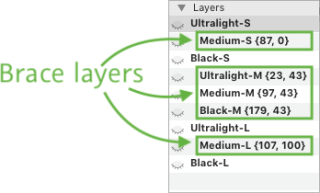
Speaking of brace layers: Glyphs inserts them automatically during import to match the interpolation to the icon in the SVG template. Brace layers support the interpolation by providing an additional intermediate master at a neuralgic coordinate in the design space. That way you can achieve an unlinear interpolation. You can spot them in the Layers palette by the curly braces in their names:
In icon templates, you can usually get rid of some. A good way to find out whether you really need that brace layer or not is to select all outlines (Cmd-A), copy them on to the layer’s background (Paths > Selection to Background, Cmd-J), turn on View > Show Background (Cmd-Shift-B), and then, re-interpolate the layer through the context menu in the Layers palette. If the differences between fore- and background are subliminal only, you can kill the brace layer without much of an impact on your shapes.
There is another important thing you can change: the grid. Go to File > Font Info > Other > Grid Spacing and Subdivision and adapt these values if you need less or more precision. All outline nodes will snap to the grid defined by these values. By default, only integer values are supported, i.e., grid spacing is 1, subdivision is 1, and the effective grid step is 1÷1=1 as well. If, however, you need more precision, consider changing the Subdivision value to 10 or 100. That way you get an effective grid step of 1÷10=0.1 or 1÷100=0.01. You get the idea.
Export the Symbol Template
OK, now that we have made the desired changes, and insured outline compatibility, it is time to export the template again, so the developer can insert them into Xcode. The developer needs an .svg file again, structured just like the one we imported. Luckily, the plug-in we installed before not only provides an import option, but also an export option. So, all you have to do, is choose File > Export… and in the dialog sheet that follows, pick SF Symbol:
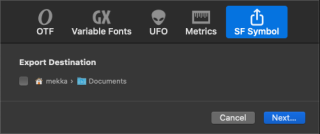
Confirm by clicking on the Next… button and the SVG will be written on your hard drive. My smiling heart looks like this now:

Congratulations! This is exactly the file that an Xcode project needs in its assets.
Appendix: Design Space
OK, so here is the fine print. As mentioned above, the symbol variants are distributed across a two-dimensional design space. A design space is a Cartesian coordinate system, but instead of x and y axes, you get design axes: in our case a Weight axis and a Size axis. The Weight axis ranges from 22 to 202, and the Size axis can have values between 0 and 100. And in this realm, the symbol variants are spread out like this:

You can see that the variants are placed on predefined positions in the design space. The values of the Weight axis (22 through 202) correspond to the thickness of the stroke. You can see that smaller sizes tend to have slightly thinner strokes. That is because small icons would appear too dense and dark with the same stroke, so you have to thin it out a bit to achieve the same optical appearance. Type designers call a tweak like this an ‘optical adjustment’.
The same goes for the Size axis. The numbers (0 through 100) are simply percentages for the position on the axis. Smallest (0) and largest (100) sizes are the outer ends of the axis, or at the ‘extremes’, as type designers like to call it. The middle size, however, is not placed at 50, where you might expect it mathematically, but rather where it makes more sense optically, which happens to be close to the center, but off a little bit towards the small end of the spectrum.
Alright, I guess I could not fool you. You probably noticed that some of the circles are filled rather than just white. The four circles in the corners of the design space (the ‘extremes’) indicate the position of the four masters. The white points between are usually referred to as instances, and can be interpolated.
The positions of the instances are also where brace layers may end up. A brace layer is an additional master. So, in our chart, a brace layer at one of these positions would turn the respective white circle into a filled circle as well. From experience, you do not need many brace layers. With a little luck you can even do without them completely. But if you do need them, one or two for sizes 0 and/or 100 and between weights 80 and 100 usually suffice. Stroke thicknesses usually grow linearly from the lightest to the regular or medium weight. From medium to boldest weight, it is often too dense for all strokes to grow linearly, and some strokes take the blame and stay a little thinner than the others. And that is when you add an intermediate master a.k.a. brace layer. Standard procedure for type designers, now a concept quickly winning territory in UI design.
Here is a precise overview of all possible design space coordinates (Weight, Size) for SF Symbols, or in other words, potential brace layer positions:
| Ultralight | Thin | Light | Regular | Medium | Semibold | Bold | Heavy | Black | |
|---|---|---|---|---|---|---|---|---|---|
| Large | 25, 100 | 39, 100 | 66, 100 | 87, 100 | 107, 100 | 124, 100 | 144, 100 | 175, 100 | 202, 100 |
| Medium | 23, 43 | 37, 43 | 60, 43 | 79, 43 | 97, 43 | 112, 43 | 130, 43 | 158, 43 | 179, 43 |
| Small | 22, 0 | 34, 0 | 54, 0 | 70, 0 | 87, 0 | 99, 0 | 116, 0 | 139, 0 | 161, 0 |
Remember to keep the number of brace layers to a minimum. But if you do want to put a brace layer at any of these points, you add it in the layer panel (with the plus button) and change its name to include curly braces with the comma-separated design space coordinates between them, e.g., Medium Small {87, 0}, then re-interpolate (through the context menu or the gear menu), and then make your adjustments, and you’re done.
Update 2020-11-13: updated text for Glyphs 3.
