New Features in Glyphs 2.4
17 November 2016 Published on 15 November 2016
Welcome to Version 2.4 of Glyphs! Take a moment and read through what’s new. You will find that new Glyphs has some great new stuff waiting for you. As always, you can update simply by choosing Glyphs > Check for Updates… and confirming the dialog that appears.
Preliminary Support for Variable Fonts
If you followed the news, you know that a few weeks ago, at the ATypI conference in Warsaw, an update to the OpenType standard was announced. In a joint presentation, representatives from Adobe, Apple, Google, and Microsoft outlined OpenType 1.8, and its main new addition, Variable Fonts or Font Variation or Variation Fonts. I spare you the details, because John Hudson has written an excellent summary already, and we do not need to redo his work here.
To cut a long story short, you can now export single- and multiple-axis Multiple Master files as Variable Fonts. And Brace Layers are supported too, by the way. (Careful, Bracket layers are not.) For that very purpose, we added a new option in the File > Export (Cmd-E) dialog:

We gave it a GX icon for nostalgic reasons. That’s it, nothing more to it, it’s that easy! You can get all your Multiple Master projects out as Variable Fonts in a single step, no kidding.
Attention: At the moment, Variable Font support is only experimental. The export function of Glyphs 2.4 does not create fully spec-compliant font files, because it does not create all necessary OT tables for full functionality. Do not release Variable Fonts created with Glyphs 2.4. Use it only to prepare your font files, so you can release quickly when full OpenType 1.8 support is implemented.
Expect browser support early next year, and hopefully, major DTP apps like InDesign will follow quickly. Until then, you can test your Variable Fonts in Google’s Fontview and in the latest Webkit Nightly Builds. Have fun! And please let us hear your feedback in the forum.

Color Fonts
It’s true: Adobe Photoshop now supports Color Fonts with an SVG table! That was enough reason for us to add a specialized custom parameter called Color Layers to SVG. What it does is export indexed Color layers into an SVG table. Yes, these are the exact same layers you have already been using to create Microsoft-style CPAL/COLR fonts. In other words, you can simply build your Microsoft color font as described in the tutorial, slap in that parameter, and have both formats covered. Pretty cool.
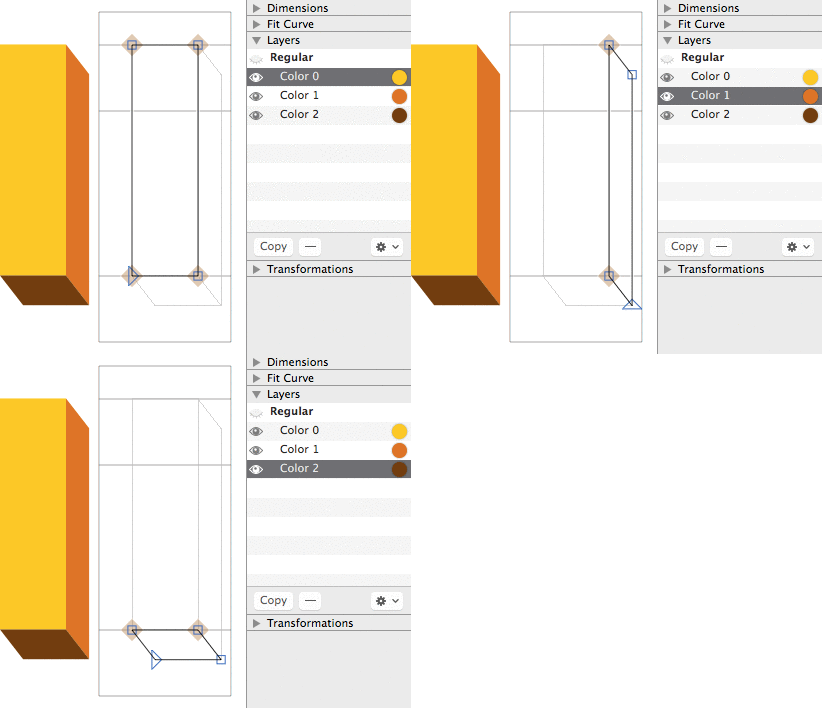
There are three new custom parameters: Export COLR Table, Export sbix Table, and Export SVG Table. Use them to control which of the color tables are generated and inserted in the exported OpenType font.
Interpolation
A lot of little improvements make interpolating easier and more fun. For one thing, Edit > Show all Masters now also shows Brace and Bracket layers.

Like in Brace layers, you do not need to specify the master name for Bracket layers anymore, just the brackets values will suffice, e.g., [150] or ]200]. Cool.

And Bracket layers now support two axes! Use [weightvalue,widthvalue] as notation in the layer name, e.g., [200,150].
We added a new instance custom parameter called Local Interpolation, which allows to set separate interpolation values for specific glyphs. This is useful especially for dense glyphs like the lowercase g. The notation is simply semicolon-separated interpolation values, followed by an include: statement, followed by comma-separated glyph names. So, depending on how many axes you have, you will end up with values like this:
<weight>; include: <glyphnames>, e.g. ,120; include: a,g,g.ss01<weight>;<width>; include: <glyphnames>, e.g. ,120; 300; include: a,g,g.ss01<weight>;<width>;<custom>; include: <glyphnames>, e.g. ,120; 300; 30; include: a,g,g.ss01

Path Editing
There is a new context menu item available when you are editing paths in Edit view. It is called Close Open Paths, and, you guessed it, it closes all open paths. But it does so with a twist: It finds pairs of nearest open path endings in selected paths, and connects this with each other. Sounds complicated, but it is really easy: Simply select the paths you want to close or connect with each other, and choose Close Open Paths from the context menu. That’s it.

And you can now decompose specific corner components. This is how: Right-click the grey knob of a corner component to bring up its context menu, and choose Decompose Corner. The path of that corner component will then be decomposed and injected directly into the host path.

Image Improvements
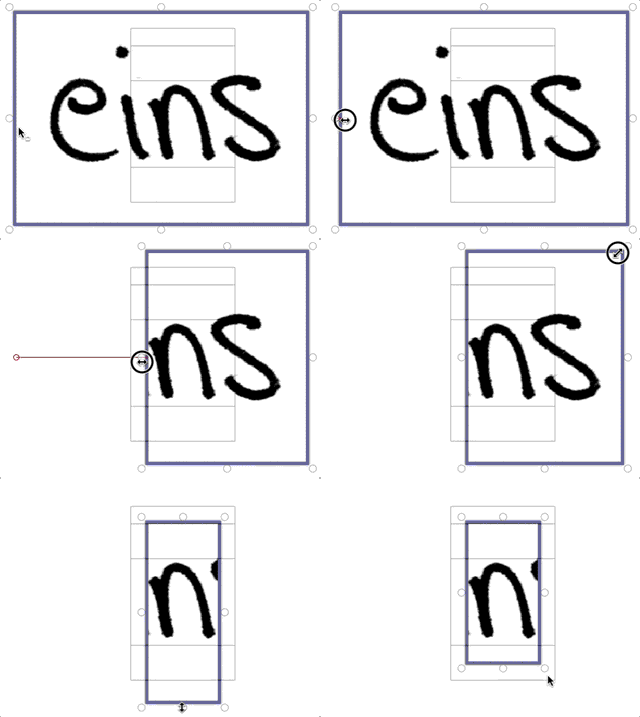
You know you have always been able to drag an image file from the Finder into a glyph cell, and the image will be placed behind the drawings. Now, you can also copy a file in Finder (Cmd-C) and paste it inside the glyph cell (Cmd-V). Cool.
Also, we dramatically improved image cropping. Firstly, we fixed the long-standing Set Crop to Layer Bounds bug. If you happen to be one of the users who have been using it, I can hear your sigh of relief now. Secondly, you can now dynamically crop with the Bounding Box (Cmd-Opt-Shift-B)! To do that, simultaneously hold down the Ctrl and Opt keys while you are dragging any of the Bounding Box handles:
Sidebar Filters
New sidebar goodness! We added the self-explanatory Has Anchors to the smart filter options.
And we changed the way some smart filters are applied: They now work on the active master only, not just all masters at once. That will make it easier to track down problems in certain masters. And to ignore old backup layers.
Better Compression for WOFFs
Web designers and UX people will love this: Glyphs now exports even smaller WOFFs. How did we do that? Glyphs now uses zopfli compression, which yields an extra save on woff file size. Many thanks to Jakob Runge for this suggestion!
Localizations
Localization has always meant two things for us: firstly, the user interface. The new versions sports updated Chinese, Japanese, Portuguese, and Spanish localizations. A big thank you to all the contributors! And there is a new language as well: thanks to Nurullah Godogan, Glyphs now speaks Turkish. Çok teşekkür ederim!
Secondly, it is about the languages your exported fonts support. For instance, through the automatic generation of the locl feature. Glyphs now truly and fully implements Dutch, supporting not only Iacute_J.loclNLD, but also I_J.loclNLD and Jacute. While you’re at it, you may want to re-read the updated tutorial on the Dutch IJ. Many thanks to Rob Mientjes for his advice in this matter.
Something we are particularly proud of is the support for minority scripts. Thanks to your input and feedback, we have Tifinagh now built into the Languages sidebar. A tremendous applause to the fabulous people involved in the Typographic Matchmaking Workshop in Marrakech last year, especially Juan Luis Blanco and Brahim Boucheikha!
For Japanese, Glyphs now has default GSUB features for ROS Adobe-Japan1-3, and we now use the right Japan1 CMAP. Oh, and we improved the Japanese groups in the Font view sidebar. And we fixed the export of CID fonts with glyphs that are not covered in the ROS.
Apropos of Japanese: Toshi Omagari translated the Glyphs Handbook into Japanese, and we are very grateful about it. It is available for download on the Get Started page.
We improved the automatic feature code for Indic scripts. We fixed and improved Arabic and Persian liga code. Speaking of which, Glyphs now remembers the last LTR/RTL setting when you open a new tab. In the course of this, we also added the Khmer script tag to the mark attachment features.
And you will finally also find Georgian in the TTF Autohint options parameter. You can set it both as Fallback Script and Default Script. Not sure what those are? Read a detailed explanation in the TTF Autohint options entry in the appendix of the Glyphs Handbook.
TrueType Zones
Now you can add separate TTF Zones with the custom parameter of the same name. All you need to do is to add your own TrueType zones, is access File > Font Info > Masters (Cmd-I), add the parameter, and edit the values. Done.

TrueType zones work very much like PS zones, but they can do a little more. Not only can you have overlapping zones, you can also link zones to each other with the Align option. This way, you can make sure, that, for instance, the small cap height always keeps its distance to the x-height, no matter what pixel rounding is applied at whatever pixel size. Cool.
As you can imagine, if you want to interpolate, don’t forget to keep your TTF Zones compatible throughout all masters. By the way, this marks the point in the history of Glyphs where TT and PS hinting can now be set up completely independent from each other. You can have separate zones and stems. And, of course, manual hints have always been separate.
TrueType Instructor: Deltas, Shortcuts, and more
Speaking of TrueType, you can now add delta instructions with the TrueType Instructor tool (shortcut I). To do that, select an instance in the Preview area at the bottom and a pixel size in the grey info box (Cmd-Shift-I). Then, simply select a touched node and press the up and down arrow keys to move it, that’s it! Now you can watch the delta do its magic on the hinted red outline and the ClearType preview in the background:

This will insert a delta offset for this very instance at this very pixel size. Delta instructions are marked with a Greek Delta symbol, and if you select one, the grey info box will show a Delta button. If you click on it, you can see the Delta info, telling you which deltas are implemented at which pixel sizes. To remove a delta instruction, simply select it, and press the Delete key. Keep in mind that deltas are not compatible with Variable Fonts. So, this applies only to singleton TrueType-flavored fonts.

And we added keyboard shortcuts for the TrueType Instructor tool (I). You can see the keys listed in the context menu. On an English keyboard, you can now use A for Add Anchor, S for Add Stem, D for Add Diagonal, F for Add Align, and G for Add Interpolation. Note that the shortcuts can be different on different keyboard layouts: it is always the row of keys next to Caps Lock. TrueType hinting has never been so fast!
Also, there is a new parameter called TTFOvershootSuppressionBelowPPM. With it, you can set a pixel size up to which overshoots are reliably flattened out. In combination with properly set TTF Zones, you have pretty good control over your TTF’s appearance. If you have done TT production before, you will agree this is a godsend.
For the TrueType Instructor tool, we received a lot of valuable input from Frode Bo Helland. Many, many thanks!
New Custom Parameters
Custom parameters help you control the output of File > Export. You can pretty much do anything. There is a long list of available custom parameters in the appendix of the Glyphs Handbook, and there is a quick tutorial about it. And now, there are these new parameters:
Firstly, we added the Decompose Glyphs parameter. It helps you control components affected by a Rename Glyphs parameter. Remember, when a glyph is changed by renaming, all its components are changed as well. If you do not want to have that happen to the components for whatever reason, you can preserve its current state by decomposing it with the new parameter.
Secondly, the new Disable autohinting for glyphs parameter excludes a specified list of glyphs from PostScript autohinting. Yes, this only works with CFF currently, since ttfautohint does not offer exclusion of single glyphs yet.
Thirdly through eigthly, the Color Layers to SVG, Export COLR Table, Export sbix Table and Export SVG Table, as well as Local Interpolation and TTFOvershootSuppressionBelowPPM parameters, which we mentioned above already.
And the Value field of Filter parameters is now way more tolerant when it comes to the use of whitespace.
Improved AppleScript support
Most of you know that you can access practically any object in Glyphs through the Python API. But for the hardcore Mac geeks amongst you, there is now extended and much-improved support for Apple’s Open Scripting Architecture (OSA), meaning you can now use AppleScript to control Glyphs!
Here is some sample code to get you started:
tell application "Glyphs"
    tell font of first document
        repeat with thisGlyph in its glyphs
            tell thisGlyph
                log {name as text, unicode as text, count of layers}
            end tell
        end repeat
    end tell
end tell
If you do something funny with AppleScript, please let us know. We are eager to hear about it.

Python Improvements
Speaking of scripting: If you find yourself using the Macro window a lot, and you always found the type size too small, you will now appreciate the somewhat hidden default setting MacroCodeFontSize. This is how it works:
Glyphs.intDefaults["MacroCodeFontSize"] = 13To reset it to its defaults, you would type:
del(Glyphs.defaults["MacroCodeFontSize"])Changes become active after an app restart. Many other small improvements have been made in the Python wrapper. So keep an eye on docu.glyphsapp.com.
Hidden Settings: Keyboard Increments and More
Are you kerning a lot with Cmd-Opt-arrows (1-unit steps) and Cmd-Opt-Shift-arrows (10-unit steps), or spacing a lot with Ctrl- or Cmd-arrows (1-unit steps) and Shift-Ctrl- or Cmd-Ctrl-Arrows (10-unit steps), and not happy with the increments? Well, now you can set your own increments! But shhhh, it is still a hidden setting, i.e., there is no UI for it, yet. Bring up the Macro window, type (or copy and paste) this, and press Run:
# Kerning increments:
Glyphs.intDefaults["GSKerningIncrementLow"] = 5
Glyphs.intDefaults["GSKerningIncrementHigh"] = 50 # with Shift
# Spacing increments:
Glyphs.intDefaults["GSSpacingIncrementLow"] = 2
Glyphs.intDefaults["GSSpacingIncrementHigh"] = 5 # with Shift
And are you unhappy with the threshold zoom level at which the little grey metrics info appears or vanishes in Edit view? Well, try this in your Macro Window:
Glyphs.intDefaults["TextModeNumbersThreshold"] = 300The default is 100, to give you a point of orientation. Again, to reset to the defaults, you would use Python’s built-in del() function on the defaults or intDefaults entry, or set it to None. Approximately like this:
del(Glyphs.defaults["TextModeNumbersThreshold"])
# Alternatively, set it to None:
Glyphs.defaults["TextModeNumbersThreshold"] = None
New Smart Glyph Options
We made smart components even more flexible. Next to _part, you can now also use _smart as glyph name prefix. And secondly, but most importantly, you can now have no less than twelve parameters in a smart glyph. Knock yourself out!
While we were at it, we also improved the way smart components work in Brace layers. And we much improved the way Width and Height parameters interpolate when resized using the bounding box (Cmd-Opt-Shift-B).

Oh, and did you notice the Smart button when a smart component is selected? It gives you one-click access to the smart component settings when smart properties are detected inside a component. Cool.
UI Improvements
Very often, it is the sum of the little things that really make your font-making day easier. If you agree, you will appreciate that you can now concatenate multiple search terms in the Find Glyph dialog (Cmd-F). Want to find all circumflexed small-cap glyphs? Type in circum sc, and there you go:

Of course, you can select multiple glyphs in the results and add all of them at once to the Edit tab. One of the most frequent questions in the forum, at least since we introduced the warning symbols for outdated metric keys, is, ‘What are these?’ Well, now, we added tool tips! Let’s see what this does to the forum traffic. Many thanks to John Gardner for his valuable input on this one:

Say, you have put together great test strings in that tab. And then, you accidentally close it. Ugh, all the great sample text was lost! Fear no more, you can now reopen the last closed tab: Open the View menu, hold down your Option key, and choose Reopen Last Closed Tab (Cmd-Opt-Shift+W). Phew, that was close.
Better Plugin Manager
The Plugin Manager now reliably prompts the user to install git when it is not available on the system. Git is the software necessary for downloading and updating the plug-ins. So, if you are one of then people for whom the Plugin Manager would not work, please try again and let us know if you still have difficulties.
And there are a couple of new third party plug-ins available again, including Daniel Gamage’s crazy-genius Extrude tool and Selection Palette. Daniel wrote both of them in ObjectiveC, so they are very snappy. Find them in Window > Plugin Manager, alongside with a whole bunch of other great plug-ins.
Speaking of which, we revamped the Extend page. Head on over and have a look.
Sierra Compatibility
Yes, Glyphs 2.4 is compatible with macOS Sierra. You can safely update your systems now.
Many little improvements
As with every update, there are many small improvements and bug fixes that will make your day a little easier. Here is just a little selection:
- When you duplicate a layer in the Layers palette, the new layer name will just consist of a short version of date and time.
- When you clear a layer with Edit > Clear, the glyph width is kept.
- You can now align an anchor with an anchor of the same name in the background: select a single anchor, and choose Paths > Align Selection (Cmd-Shift-A).
- iColor layers are now rendered in Font view already.
- The context menu option Show all glyphs that use this glyph as a component is now also available when the Text tool (T) is active.
- Kerning is now always rounded to the grid.
- When a corner component is mirrored, its alignment is flipped as well. Makes sense in most cases.
- Filter > Transformations will not scale components any more if the base glyph is scaled too. This avoids the dreaded double-scaling of components.
- When iOS GlyphsViewer tries to access the Edit view, Glyphs.app will ask its user for permission on the Mac.
- Glyphs is now much better at guessing the smoothness of nodes (i.e., their green/blue status) when adding or removing nodes from a path.
- Show error for glyphs with many nodes to prevent subroutinisation problems
Finally, a bucketful of crashes could be fixed thanks to the crash reports you have been sending, and many little bugs were squished thanks to your reporting in the forum. Thank you all for your continued input!
Sample fonts: Salom by Igor Labudovic, Sephora Sans by Schriftlabor
