Multiple Masters, part 2: keeping your outlines compatible
Let’s now learn how to make compatible drawings that are ready for interpolation in Glyphs.
Understand outline compatibility
When interpolation happens, what actually is being interpolated are the x and y coordinates of each and every node, handle, component, and anchor. Points and components are stored in a specific order, which must be the same in every master.
In short, we need compatible outlines for interpolation. To achieve outline compatibility, we must make sure:
- all masters have the same amount of paths, nodes and handles, anchors as well as components
- all components, paths, nodes and handles are in the same order across all masters.
- all masters have the same set of anchors
That’s it! That’s all we need to make the magic of interpolation possible.
Find incompatible glyphs
Glyphs with incompatible outlines are marked with a red triangle in Font view (Cmd-Opt-1):

… or a red stripe at the top when they are opened in Edit View:

And in Font view (Cmd-Opt-1), you can also filter for incompatible glyphs. The default installation comes with a preinstalled smart filter called Incompatible masters in the left sidebar:

If it is not there anymore, you can add a smart filter through the gear menu in the lower left corner of the window:

In the upcoming dialog, you give it a name that makes sense to you, and from the attributes, you pick Master Compatible, and as its boolean value No:

Confirm the dialog and ta-daa: now it is listed in the sidebar, under Filters.
Make glyphs compatible
If you encounter an incompatible glyph, we have three lines of defence for establishing outline compatibility:
1. Correct path directions
The first and foremost reason for incompatibility is a wrong start point, closely followed by differing outline orders in the various masters. Both of which can, in a large part of the cases, be fixed with Paths > Correct Path Direction (Cmd-Shift-R), or if you hold down the Option key, Paths > Correct Path Direction for all Masters (Cmd-Opt-Shift-R):

This command actually does three things:
- it analyses the path structure and if necessary toggles the path direction (clockwise vs. counterclockwise) for each path,
- it normalises the start node for each path, usually to a position as close to the baseline as possible and as far left as possible,
- it reorders the shapes (paths and components), usually from bottom left to top right.
With a little luck, the glyph is compatible now. No dice? OK, on to the next step.
2. Reorder shapes
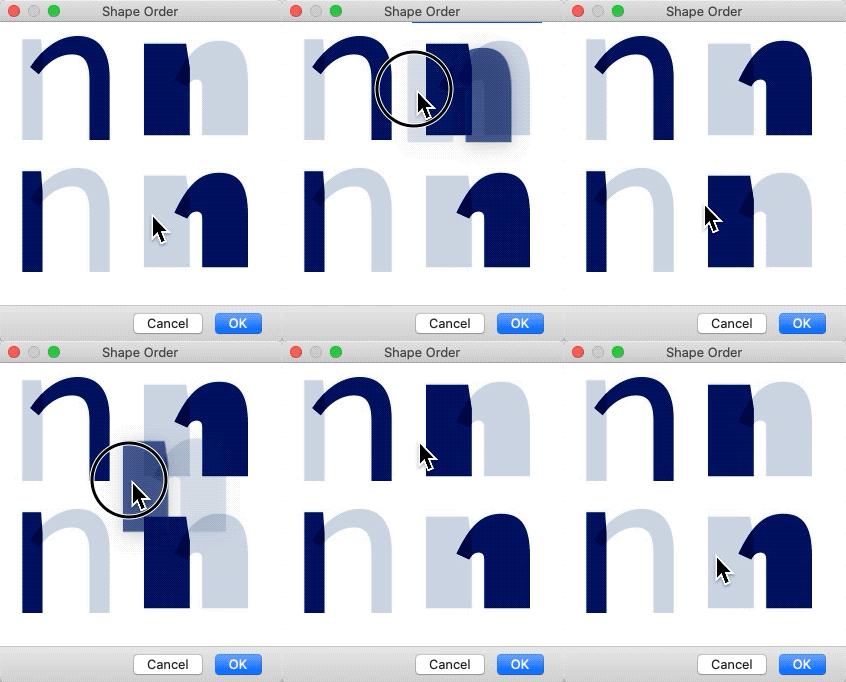
Time to get our hands dirty. Pull up your sleeves and choose Filter > Shape Order:

… and you are greeted with our infamous shape order dialog. Each line represents a shape, each column represents a master or intermediate master. If you have two masters, you will see two columns. Your job now is to make sure to drag all shapes in all columns into the same order, so that each line consists of corresponding shapes only. All you need to do, is click and drag:
Still not compatible? Alright, time for our wonder weapon …
3. Compatibility view
Let’s open that glyph in Edit view, and make use of the very handy View > Show Master Compatibility (Ctrl-Opt-Cmd-N) also known as ‘compatibility view’:

What you see is:
- all relevant masters for the interpolation of this glyph in an exploded view,
- each shape in a colour code indicating the shape order (same colour means same order),
- an index number next to the start point of each shape, also indicating shape order,
- connecting lines between start points, also indicating which shapes connect across masters,
- connecting lines between anchors,
- connecting lines between corresponding selected points,
- colour-coded line and curve segments (see below).
The colour codes indicate a couple of things:
- green: compatible segments,
- yellow: technically compatible segments, but with angles deviating more than 20° between masters, hinting at a wrong start point,
- red: incompatible segments; either the corresponding segment is missing in the other master (different number of points), or it is a curve segment in one master and a line segment in the other, i.e., the segment types are not compatible.
Missing node
If you see a yellow or red segment, a cool way to see where the problem exactly is to select one of the nodes on the problematic path, and simply tab through the nodes to see which ones connect correctly and which ones connect with the wrong node:
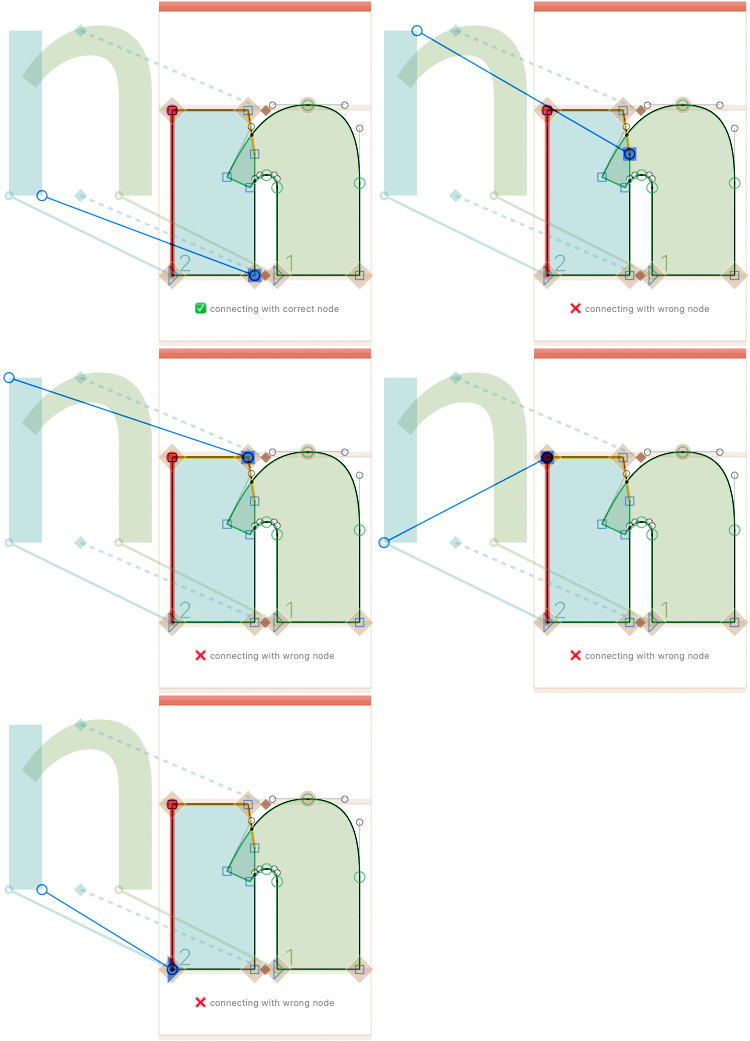
See, on path 2, except for the bottom right node, the interpolation lines hook up with the wrong node in the other master. Plus, the last segment is red, i.e., it has nothing to interpolate with in the other master. That means the path in the other master is lacking a node.
And I can tell you even which node it is: the one after the correctly connected node. The other master is lacking that corner in the overlap for opening the whitespace on top. How did I find out? Easy. The trick is to go to tab to the last node that is still connecting correctly, and go ‘phew, so far so good’. Then you tab on to the first node that does not hook up properly, and you have your most likely suspect.
So, we simply switch to the other master, add that node and slant the top right segment a bit.
Wrong start node
Take a look at this case. You see that the left path is yellow, meaning that the path is compatible but each segment is changing its angle by more than 20 degrees. Now how can that be?

Let’s double click on one of the segments in order to select the path. And this is what we get:

Wow. Each node is connecting with a wrong node. Always the one next to the one it was supposed to interpolate with: The bottom left node with the bottom right node, the bottom right node with the corner in the overlap, the corner in the overlap with the top right node, the top right node with the top left node, and that top left node with the bottom left node.
Or you can say the same thing much shorter: the start nodes are not in sync. Actually, the Correct Path Direction command should have gotten this one right (and it normally does), but in case it does not, you have several ways to fix it manually.
First, while you are still in compatibility view, you can simply drag the start node in the other master to the position you need. See how the yellow highlight disappears once the start node is set correctly:

Or, you switch to the master where the start node is not in the right place. And there, you right click on the node you want make first and choose Make Node First from the context menu:

Or you select the path in question and repeatedly run the Harbortype script Make Next Node First, best with a keyboard shortcut, until the masters interpolate properly.
Whichever way you choose, in the end you can verify the result of your edit if you select the path again:

See how the lines stay more or less parallel, and always connect the right nodes with each other? That’s how it its supposed to be.
Missing anchors
Anchors have dashed connectors. Whenever you see one of those go to the origin point (x=0, y=0) in one master, that means that this anchor is missing in that master:

Compatibility view even displays the name of that anchor, so you know what’s going on.
In any event, these are easy to fix. Either it is a standard anchor, then you can add all missing anchors with Glyph > Set Anchors (Cmd-U), or even better, holding down the Option key, Glyph > Set Anchors for all Masters (Cmd-Opt-U). Or, it is not a standard anchor. In that case, you select and copy the anchor into your clipboard (Cmd-C), switch to the master that lacks it, and paste it there (Cmd-V).
Or if the whole situation is too confusing, you can run the mekkablue script Anchors > Insert All Anchors in All Masters. It will look for all the anchors in all masters and insert missing ones in a similar relative position.
Find shapeshifters
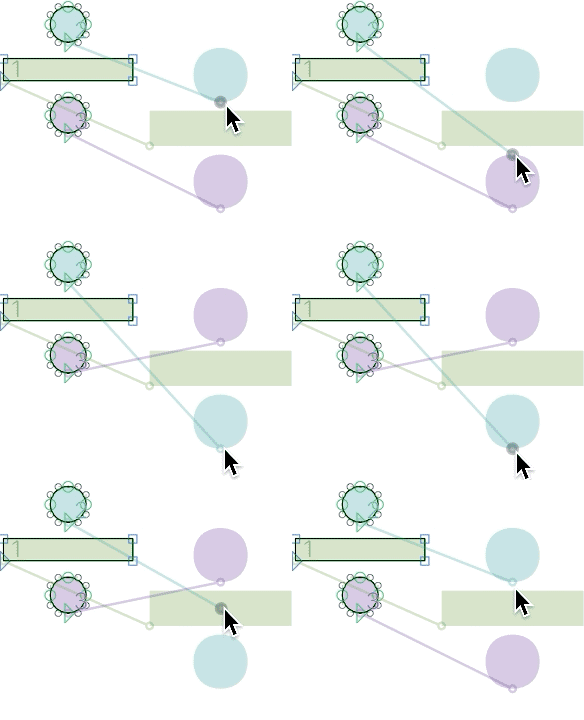
Even when glyphs are perfectly compatible, there is still a potential pitfall if there are two or more point-compatible shapes in each master. Think of cases like the equal sign (=), ellipsis (…), colon (:), quotedblbase („), or the divide sign (÷), just to name a few. If you take a look at these glyphs, with View > Show Master Compatibility enabled (Ctrl-Opt-Cmd-N), and you see the lines crossing or bypassing each other, well, you have a problem:

The masters are perfectly compatible, all outlines are green. But the lines indicate that the top dot is interpolating with the bottom one, and vice versa. Not good. Not good at all. Unless you want your divide sign to pingpong your dots around:

This is called a shapeshifter because the number of shapes changes throughout the progress of the interpolation. At the beginning and in the end, I count three shapes. Midway through the interpolation, I count only one shape, because the dots and the bar have merged.
Again, Paths > Correct Path Direction in all Masters (Cmd-Opt-Shift-R) should have taken care of this. If, however, that did not fix it, you can try and reorder the paths manually by:
- selecting and cutting one path after the other to the clipboard (Cmd-X) and immediately pasting it back again (Cmd-V),
- using Filter > Shape Order,
- or, in compatibility view, dragging the start point of one outline on top of the start node of the other:

And all is good again:

Phew! But… but… if they are so hard to spot, how do we find those pesky shapeshifters in our font?
That is a good question. Two mekkablue scripts to the rescue:
- Interpolation > Find Shapeshifting Glyphs: counts shapes in masters and interpolations in between, and reports glyphs if the counted clockwise and counterclockwise shapes are not always the same. Run this one first, and pick your analysation options wisely (look at the tooltips):

- Interpolation > New Tab with Dangerous Glyphs for Interpolation: lists all glyphs that can theoretically interpolate wrongly, i.e., all glyphs where there is a way to keep compatibility after changing a start node or reordering paths. Run this script last, open the preview area (click on the eye symbol in the lower left window corner), switch it to Show All Instances, then switch the Text tool (shortcut T), and move your cursor from one glyph to the next and see if the interpolation is OK for each glyph.
Special case: node travellers
There is a very tricky special case. Usually, it is technically not a shapeshifter because the number of cw and ccw paths stay the same throughout the complete interpolation. Remember the case above with the yellow path, the one with the wrong start point where all nodes are connecting with the next one? I like to call those cases ‘node travellers’.
They are hard to spot because the Find Shapeshifting Glyphs script will not list them, and you easily miss them when you quickly step through all interpolations after running the Dangerous Glyphs script. But here are some clues: they practically always happen on paths that have only one type of segment, either all curves or all lines. They most likely go unnoticed on small outlines (periods, dots, commas, dashes, etc.), or on thin stretched outlines (slashes, crossbars, strokes, macrons, etc.), typically with relatively short segments. And the most likely candidate for node traveling is the slashlongcomb in oslash:

Of course, it can also happen in the cap and small-cap Ø’s. See how the slash is subtly winding onward by one node index? So subtle that it is really easy to miss.
Again, there is a mekkablue script that will attempt to find those. Run Interpolation > Travel Tracker and set a threshold percentage as travel ratio, usually 40 or 50, then press Find:

The travel ratio is the allowed percentage of the glyph bounding box a node is allowed to move during interpolation. Typically, nodes stay approximately in the same position and move only a little bit, just enough to make the glyph bolder. It is very unlikely that a node shoots from one end of the glyph bounding box to the opposite side. At least not intentionally. But those are exactly the cases we are looking for here. The script will then proceed to write a detailed report into Window > Macro Panel (Cmd-Opt-M) and open a new tab with all glyphs that have nodes traveling further than allowed. It will report some false positives, mostly very small shapes that grow much bolder in interpolation, period and dotaccentcomb will probably show up in the results. You may want to fine-tune your travel ratio accordingly. But it will also catch the real node travellers. And let us sleep well at night.
Keep your overlaps
Now, you may once have heard that all path overlaps must be removed in a static font. Well, forget about it, because this is a technical problem that Glyphs can take care of automatically at export, as long as you keep the Remove Overlaps option activated in the File > Export (Cmd-E) dialog. Actually, for the purpose of interpolation, keeping overlaps in the paths is much smarter. Here is one typical example to understand why:

Look at the leg of the R. You can see it bypasses the lower node of the bowl. Keeping the leg and the bowl separate ensures interpolation. Besides, it also makes editing the R much easier, which is nice.
In case you have removed overlaps already, you can get them back by selecting a corner node, bringing up the context menu and choosing Open Corner, or with the Option key held down, Open Corner in all Masters:

Select two nodes and choose Reconnect Nodes, or with the Option key held down, Reconnect Nodes in all Masters from the context menu:

And you will end up with shapes like this:

The point is that you can edit the stem without jeopardising the integrity of the crossbar and vice versa. And you can use the overlap area for dekinking. ‘De…what?’ Read on.
Avoid kinks
There is one serious problem you should know about: interpolation kinks. Kinks will occur if you have a point constellation that meets all of these three criteria:
- three points in line to form a smooth connection,
- angles are different in the masters,
- ratios between the points are different, i.e. the proportion between (a) the distance between first and middle point and (b) the distance between the middle and last point.
If all of these three apply, a kink will happen in interpolation. For instance, take these two masters, and pay attention to the smooth point triplet on the curve:

Now watch what happens when we interpolate between these two master shapes:
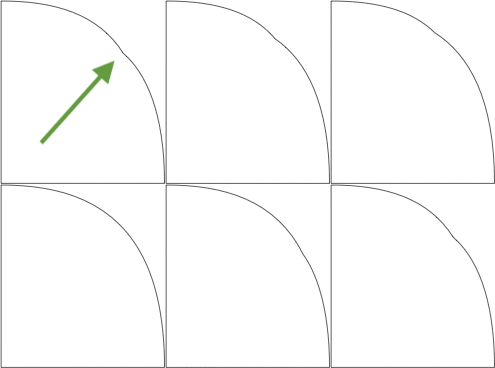
How can that be? The answer lies in the circumstance that in the Multiple Master technology, we linearly interpolate each individual point. That is OK because linear interpolation is usually okay for pretty much all our interpolation needs in type design. That means that, when the green smooth connector gets interpolated, it knows nothing of the handles next to it. Each of the three points walks its own way. And if the three kink conditions are met, those ways do not line up.
Three solutions
But we also know how we can avoid a kink: just remove one of the three conditions, and you’re good:
- If your design allows it, get rid of the triplet. Either altogether, or reduce it to two points:

Reducing node count often has the added advantage of slightly more elegant curves.
- If that is not possible, try to sync angles between masters as much as possible. A small difference may go unnoticed and thus be good enough. The triplets in this J do not cause a kink because the italic angle is the same in both masters:

As much as possible, keep your smooth curve connections either horizontal or vertical: Shift-click with the Draw tool (shortcut P) to add extremum points, then remove the diagonal points between extremums, one by one. Again, the angles are the same, and we do not need to worry about kinks.
- If none of the above are possible, try the last resort: keep the distance ratio between the points the same. Sometimes, you can extend a segment into an opened corner and thus gain more manoeuvring space for your point:

In the bold R, the triplet ratio can be maintained because the straight segments can extend comfortably into the overlap.
Finding kinks
In the mekkablue scripts, you will find a handy script called Interpolation > Kink Finder. You define a maximum kink depth you deem acceptable in interpolation, e.g., 0.8 or 0.9 units. Then the script will go looking for any kinks larger than that in all glyph interpolations:

For the extra options, see their respective tooltips. Once the script has run, it will mark ‘kinky nodes’ (the middle nodes of point triplets that cause a kink) with an emoji and a number indicating the maximum kink depth in interpolation:

Fixing kinks
You have a few options for dekinking a triplet. First, you can do that manually: select the middle point, and make sure it is green, i.e., defined as curve point rather than corner point. You can switch between smooth connection (green) and corner (blue) by pressing the Return key. Then, hold down the Option key and move the point along the line between first and last point, either with the mouse or the arrow keys:
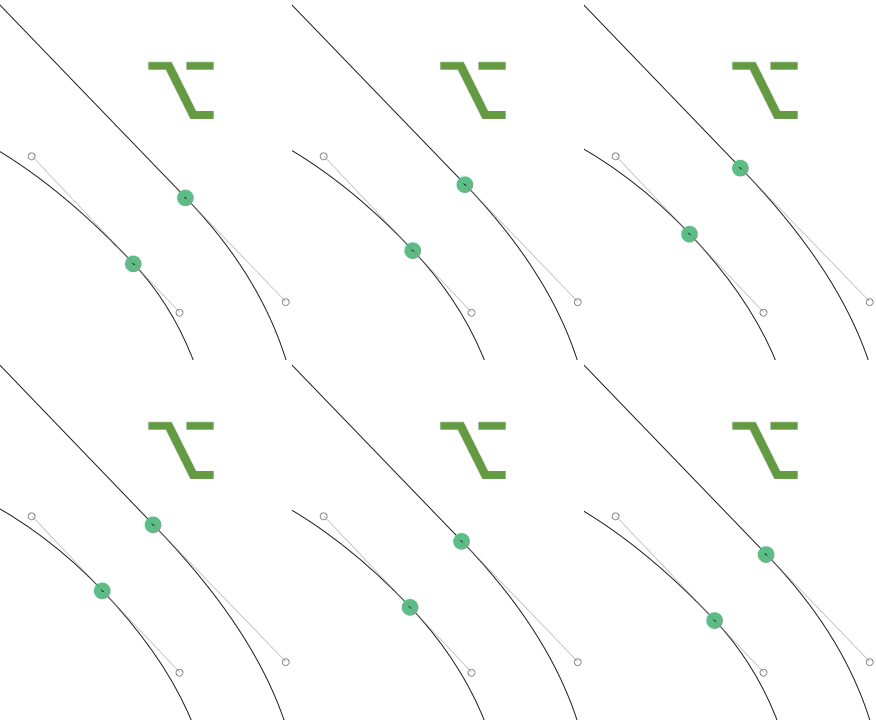
Henrique Beier’s plug-in Show Smooth Node Angle and Proportion will help you find a spot where the kink is reduced to a minimum or even completely ironed out. It displays measurements for the currently selected node, yellow if the measurements do not line up with other masters, grey if they do:

This point triplet does not cause a kink because the angle (displayed in grey) is the same as in other masters. So there is no kink, even though the proportions differ (displayed in yellow).
Or you use the Interpolation > Dekink Master Layers script from the mekkablue script collection. The way you do that is as follows: you go to the master where you think the proportions are best, select one of the three points, and run the script from the Scripts menu. The script will find the corresponding constellation in all other masters, and push the corresponding point to the same relative position in respect to the other two points as in the visible master. All point triplets should have the same proportions now. Phew, sounds super-complicated, but it is not that difficult. Take a look at this short video and judge for yourself.
A more comfortable way to get rid of the kinks is Tim Ahrens’ Remix Harmonizer, and to be precise, its Dekink Only option. The great thing about it is that it allows you to iron out these little kinks after interpolation. In other words, you do not avoid kinks, but fix them at export time. Here is how: Run RMX Harmonizer from the Filter menu, but instead of pressing any of the buttons, open its gear menu in the bottom left of the window, and choose Copy custom parameter: Dekink only:

Now you have the parameter code in your clipboard. You can simply paste it into the Custom Parameters of all affected instances in File > Font Info > Instances:

If you are afraid the parameter might interfere too much with your drawings, you can limit it to just certain glyphs by adding an include statement with a comma-separated list of glyph names. The Value of your custom parameter will end up looking something like this then:
RMXHarmonizer; dekink; include: A, V, W, K, X, X.ss01That’s it. When your font family is exported, the Harmonizer will correct any post-interpolation kinks it encounters.
Now, ye all go forth and make your masters compatible!
Read on: Multiple Masters, part 3: Setting up instances
Update 2014-03-07: added link to Python script in section ‘Be Suspicious’.
Update 2014-08-23: updated link for the Dekink demo video.
Update 2015-07-21: updated for Glyphs 2.
Update 2017-10-30: added RMX Harmonizer > Dekink only.
Update 2018-07-05: minor update about Dekink Masters usage.
Update 2021-01-06: rewritten and updated for Glyphs 3.


