


Reusing shapes: brushes
Brushes are a fantastic way to expand mere path segments into full-blown shapes. Let’s draw an arrow.
Create a _brush glyph
Choose Glyph > Add Glyphs… (Cmd-Shift-G) and type the name of your brush glyph. It must start with _brush, followed with a dot suffix. In our case, I will try _brush.arrow:

Make sure you have exactly one closed path in it. Subsequent shapes will be ignored. Add start and end anchors by choosing Glyph > Set Anchors (Cmd-U) or Set Anchors for All Masters (Cmd-Opt-U):

The shape will be stretched onto the receiving path segment using these anchors als size reference. Anything beyond the anchors will remain fixed, anything between them will be stretched or squeezed to whatever size is necessary.
Also note the curve handles on the horizontal segments between the anchors. They will allow the brush to not only stretch, but also bend onto the receiving segment. I’ll show you that in a minute.
Apply to host paths
Now, create a new glyph and draw a couple of paths. Typically, you would prefer open outlines, or even single-segment paths:
To apply the brush to the segments, select them, and pick Add Brush from the context menu:
And here we are:
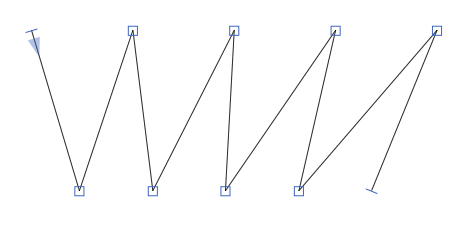
Apply to multiple segments
You can also apply a brush to (multiple) segments of a longer path. Usually, you will want to be selective as to which segments will receive brushes and which will not. Otherwise you end up with something like this:

What you need to do here is to apply the brush to individual nodes rather than segments. So, instead of the segment, you select the last node of each segment, and proceed to add brushes through the context menu like we did before. Then the brushes will be added in such a way that the end anchor coincides with the selected nodes:
Complex brushes
Let’s take the complexity a bit further. Say, you want a wurst brush, with a highlight in the path:

Well, you can have that too, but as stated above, a brush can only have a single outline, and additional paths will be ignored. But that is not really a problem, you just need to make sure that the whole wurst is one single outline. And that is easy: first, merge outlines where you can. And secondly, for counter shapes (like the highlight of our wurst), select two opposing points on both outlines, turn them both into blue corner points if necessary (by pressing the Return key or double clicking the nodes), and pick Reconnect Nodes from the context menu:
That way, you create a hidden gap in the outline here:

But more importantly, you merged the outer path with the counter into a single outline. Now, you can apply the wurst to any host path, and you can have as much wurst as you want, all across your font.
Disclaimer: no animals were harmed in the making of this tutorial.


