


New Features in Glyphs 2.5
13 April 2018 Published on 12 April 2018
It is that time of the year again, we are presenting another important release of our favorite font editor. And we are pretty sure you will like it. Here is what’s new since version 2.4.3.
Note: This post also covers changes that have been introduced in Version 2.4.4.
Editing
In the Paths menu, you will find a new entry called Paths > Other > Make Corner. It will turn any partial outline selection into a corner by elongating the outermost segments of the selection. ‘Huh?’, I hear you say. Well, as the saying goes, one animated GIF is worth a thousand words:
Pretty cool. Works with curve segments, too, by the way.

In the Paths > Other submenu, you will also find Reconnect Nodes and Open Corners. All of these, of course, are available in the context menu. But also having them in the pulldown menus makes them available for assigning keyboard shortcuts in System Preferences > Keyboard > Shortcuts > App Shortcuts, like this:

We expanded the Edit > Select All (Cmd-A) behaviour in Edit view. Now, when you press Cmd-A repeatedly, you cycle through: (1) selecting all paths, (2) adding all components and anchors to the selection, (3) selecting all corner and cap components, (4) selecting all PostScript hints. And as always, you can cancel the selection with Edit > Deselect All (Cmd-Opt-A).

You know you can add curve handles (BCPs) to a straight segment by Opt-clicking the segment with the Select tool (V). We added a little twist to it. If you also hold down the Shift key, the handles will be horizontal or vertical. We are going to save so much time now:

In order to determine the handle orientation, Glyphs makes an informed guess based on how the curve continues. Pretty cool.
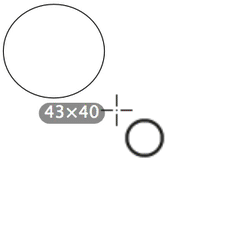
When you click and drag to draw a rectangle or an ellipse with the Primitives tool (F), a small size indicator now shows you the current dimensions:
You have gotten to know and love Open Corner from the context menu. Now you can hold down the Option key when the context menu is open, and the command will magically change its wording to Open Corner in all Masters, which does exactly what the name implies. Remember that the algorithm for opening corners will respect the standard stems set in File > Font Info > Masters for determining the size of the triangular overlaps it will introduce to the outline.

We refined the way you can display and hide your nodes. In the View > Show Nodes submenu, there are a few options: In Foreground (Cmd-Shift-N) and In Background. The former has been around for a while and only moved into this submenu now, but the latter is completely new. It will help you see where the handles on your background paths and components are:

Needless to say, you can align your foreground nodes and handles with the points in the background: Bring them close together, and press Cmd-Shift-A (Paths > Align Selection) et voilà, nodes snap to the background outlines!
Speaking of the background, you can now determine foreground and background stroke colors in Glyphs > Preferences > User Settings:

Speaking of aligning: If you want to align anchors, you can now select any number of path points together with your anchor, and align via Paths > Align Selection (Cmd-Shift-A). The selected anchors will be moved horizontally to the average x coordinate of all selected path points. That implies that you can also select one node and one anchor, and align the anchor exactly on top of the node:

Image handling is much improved. You can now copy images from Photoshop or other image editing software and paste them directly into a glyph layer. Since images cannot be embedded, Glyphs will create a folder called Images next to the .glyphs file and store the bitmap images there. Cool.
Images and components can now be scaled and rotated with decimal numbers in their respective grey info boxes. Remember that the entering of decimal numbers adheres to your macOS locale settings in System Preferences > Language & Region > Advanced.

Variable Fonts
First of all, just in case you missed it, we published a Variable Font tutorial that describes the current workflow for building OTVar fonts in Glyphs. Glyphs supports 6 variation axes, with much-improved delta calculation, and GPOS variations (including kern and mark features).
We improved the UI of Masters and Instances settings in File > Font Info. It only shows the axes defined in the Axes parameter in File > Font Into > Font:

Pretty cool news for dollar and cent signs: Bracket Layers are now supported out of the box. That means that you can switch glyph shapes somewhere along an axis, and the switch will be exported as a feature variation.
And we have a few new custom parameters:
-
Enforce Compatibility Check
When added in File > Font Info > Font, Glyphs will indicate outline incompatibilities even when there are no instances set between masters. -
Style Name as STAT entry
Added in File > Font Info > Instances. Takes the instance style name as combinable display string for an axis range. As value, use the four-letter axis tag to which the display string applies. You will want to use this in instances that are non-normal on one axis and normal on all others:
Example: In the Light instance (non-normal on the weight axis, normal on the width axis), use this parameter with the value
wght, and Light will be a combinable display string on the weight axis. -
Elidable STAT Axis Value Name
Added in File > Font Info > Instances. Declares the instance style name as elidable for the axis specified in the parameter value. As value, use the four-letter tag of the respective axis. You will want to add this parameter in the Regular style, and you will add one for each axis, indicated in the value:


Masters
-
Master Icon Glyph Name
Add in File > Font Info > Masters. You can define a glyph which is used instead of the lowercase n for the master buttons in the main window. Setting this parameter is equivalent to setting a glyph name via the new button in the top right of File > Font Info > Masters. Plus, in the UI, you can also pick one of the 25 predefined n’s:

And a lot of other things happened of course, too many to mention them all, so I will list just my favourites:
- You can import your
.designspacefiles. Careful: it will also read out and insert the master names. - Got zero handles in your paths? Bring ’em on. Glyphs can now handle TT conversion for retracted handles (a.k.a. ‘zero handles’ or ‘half-dead curves’) and all kinds of inflections when exporting variable fonts. Big thanks to Tim Ahrens for his input.
STATtable export is much improved. Many thanks to Rob McKaughan for his input on this complicated matter.- Attention: corner and cap components are now included in the compatibility test. So, if you cannot find the cause for a glyph’s incompatibility, take a closer look at your corner.
- You can use decimals in instance coordinates.
TrueType
Big news: You can now have TrueType curves in Edit view! When you open TTFs in Glyphs, TT outlines. TT outlines are editable:

You can convert (quadratic) TT splines into (cubic) PostScript outlines with Paths > Other > Convert to Cubic. The same command works in Font view, so you can convert TT outlines to PS for all glyphs at once. And you can go the other way with, you guessed it Paths > Other > Convert to Quadratic. Needless to say, when you export a CFF or TTF, all conversions are done on the fly.

But wait, that is not all, also binary instructions are preserved after opening a TTF, and stored in File > Font Info > Masters > Custom Parameters. If available, Glyphs will disassemble the instructions in the prep, fpgm and CVT tables for you. This will be useful if you want to fix a few things in a TTF but not tamper with the existing TT hinting. Nice.
There is also a new custom parameter in File > Font Info > Instances:
Keep Transformed Components
It prevents decomposing of distorted and mirrored components. LikeKeep Overlapping Components, we do not recommend it for shipping retail fonts. Rather, it can be very useful in case you want to post-process your TTFs.
TrueType Instructions
Now, put on your seatbelt, because this one is a biggie. We completely reworked manual TT instructions!

Here are all the changes:
-
The TrueType Instructor (I) now displays TT point indexes of on-curve nodes. You can toggle their display via the context menu.
-
Besides vertical hints, you can now also add horizontal instructions. Switch between horizontal and vertical with the direction button on the grey info box.
-
You can now add TT instructions to corner and cap components.
-
You can now add TT instructions on path intersections.
-
You can now add TT instructions on sidebearings. Glyphs will display sidebearing nodes.
-
Activate a continuously refreshing TrueType Web Preview by right-clicking and choosing Show Preview Address… from the context menu. Glyphs will provide you with a localhost address you can paste in your favourite web browser (including the Windows browsers running in virtualisation, hint-hint). The page refreshes every second and displays the content of the current Edit tab with a TTF containing the current status of TT hinting. The Preview area at the bottom of the Edit view does not need to be open for the external TrueType web preview:
-
Delta instructions now have influence on following instructions.
-
FontLab Studio’s x and y TT instructions are imported from UFOs, as long as they are exported with vfb2ufo and the
-64option. Great news if you want to transfer your TT hinting work from years past. -
When they are not attached to a zone, Anchor and Stem instructions are automatically rounded.
-
When the TrueType Instructor (I) is active, Remove All Hints from the context menu only removes TT hints, and leaves PS hints alone.
-
In the
TTFStemsparameter, you can now set deltas for each stem. It defines whether a stem is rather rounded up or down at a certain PPM size. Simply click on the Delta symbol next to a stem entry, then click once for rounding up, click again for rounding down: -
Analogously, there are now deltas for zones defined in the
TTFZonesparameter, rounding up for snapping to the next pixel edge above, or rounding down for snapping downwards. -
Also in the TTFZones parameter, align a zone to another zone to make sure that for instance, the small-cap zone makes the same movements and snappings as the x-height zone.
-
In the TTFStems parameter, if you define a TT stem for something very specific, and you do not want it to be used for anything else than just those handful of usecases you want to manually set yourself, put an asterisk
*at the beginning of the name, e.g.,*Qtail. TT stems that start with an asterisk are ignored in the Automatic stem setting of the TrueType Instructor tool (I). We therefore call them exclusive stems.


But there’s more. There is another new custom parameter:
Get Hints From Master
Placed in File > Font Info > Font, it tells Glyphs which (compatible) master has the hints you want to use. By default, Glyphs uses the hints in the first master, and automagically transfers them to all compatible other layers. But let’s say, you add a light master to your setup, but have already manually hinted your middle master. Now you do not need to rearrange your masters anymore. Instead, you open the Font tab of your Font Info, add theGet Hints From Masterparameter, and pick a master from the pop-up menu that shows up:

The parameter works for PostScript hinting, by the way.
Plus, a lot has happened under the hood. In short, TrueType hints in 2.5 are dramatically improved. Many thanks to master hinters Monika Bartels, Noe Blanco, Jens Kutílek, Rob McKaughan, and Ludwig Übele for their invaluable input.
Font View
You can now Edit > Paste Special from one glyph to many glyphs. Copy one glyph, then select many glyphs, and paste with the Option key held down, and choose to paste into all selected glyphs, that’s all there is to it. So, in a snap you can paste the same shapes into any number of glyphs:

Glyphs now draws a system font placeholder not only for glyphs wit a Unicode value, but for alternate glyphs as well. In other words, you will see placeholders not only in x, but also in x.ss01:

In further news, expanding your glyph selection by Shift-clicking should work a little smoother now. Also, the Preview Ascender custom parameter is now used for scaling the glyph images in their cells.
Reusing Shapes
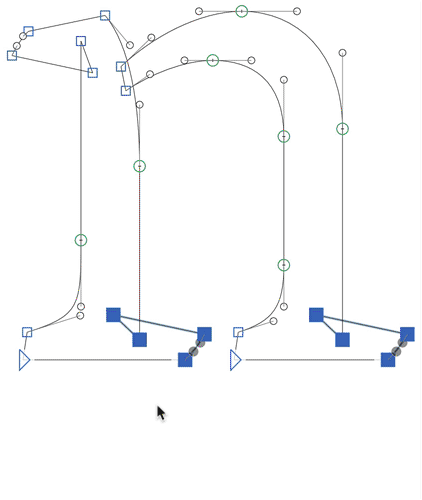
Great news for you if you have been using Smart Components: Smart Handles are here! That means that instead of resorting to the sliders, you can now create your own GUI handles for Smart Glyph parameters! To do so, simply add anchors with the same name as the respective property.
Let me give you an example. Let’s say you want a Smart Glyph with variable crossbar height, so you can use it in H and, with a lower crossbar, in Hbar as well. What you do is set up _smart.H, draw the various layers as described in the tutorial with a property called bar height in Edit > Info for Selection:

And all you have to do now is add an anchor with the same name , i.e., bar height into all layers, at a position that makes sense for a handle, say the top edge of the cross bar:

Do this for all layers. Now, when you place the Smart Component in a glyph, you do not need to open the slider dialog anymore; instead, you can simply drag the handle that appears where you added the anchors:
Wow. This will be a godsend for more complex setups, like CJK glyphs where some radicals can change a lot:

And the best thing, it is already documented in the Smart Components tutorial.
And as always, there’s a long list of small improvements you will enjoy in your day-to-day work. Here are some of the highlights:
- Now,
_cap,_corner,smartand_partglyphs have their own categories in Font view (Cmd-Opt-1). - At import, moved components are detected and auto-alignment can be disabled if necessary: A dialog will pop up and inform you with color-coded warnings: black for small movements (<10), yellow for bigger movements (<100) and red for large movements (≥100). You can choose to convert all, or keep old alignments, or cherry-pick the ones you want to force into auto-alignment.
- When you hold down the Option key while opening the context menu, you get a command called Force Auto-Alignment. For auto-aligning components that usually would not auto-align.
- Corner Components: you can now nest them. It may blow your mind, but at least the app can handle it.
- Corner Components: Glyph > Add Anchors now automatically adds
left,originandrightanchors. - Corner Components: corners are preserved when you extract outlines with Glyph > Component from Selection and when you swap outlines with the Background.
- Corner, Cap and Smart Components: performance and handling has been significantly improved, including decomposition, copying and pasting, and their behaviour with transformations (flipped and scaled) and in special (i.e., Bracket and Brace) layers.
- By popular request: components without a category are now auto-aligned by default.
- Glyph > Component from Selection: if the base component has a
toporbottomanchor, a corresponding anchor will be added in the new glyph. - Scaled components are now always decomposed in TTF exports, unless you add the custom parameter
Keep Transformed Componentsin File > Font Info > Instances.
Encoding
You can now double-encode glyphs! Simply click in the Unicode field, type the second Unicode and press Return to confirm the change and that’s it:

And here is a little trick: If you are creating an all-cap font, you can now delete the lowercase letters, and then select all glyphs and choose Glyph > Update Glyph Info. Glyphs will recognize that only uppercase letters are in the font, and assign the lowercase Unicode value as the second encoding to the uppercase glyphs. This means significantly smaller webfonts, and significantly easier glyph management: no more compound syncing between upper- and lowercase.
Read all about it in the new tutorial about Creating an All-Caps Font.
And what’s even better: a double encoding is automatically removed when the ‘other’ glyph is actually added to the font. In other words, if you decide to add lowercase letters to your font, the uppercase letters lose their double encoding. Mwah!
Support for multiple encodings implies a few more changes throughout the app: Of course, Glyphs now also properly imports double encodings from existing compiled fonts. And the Reencode Glyphs parameter now works with multiple Unicode values. And the Rename Glyphs parameter now makes sure that Unicode value and production names are properly switched as well.
You know that Unicode values are attached to the glyph name, and Glyphs automatically adapts the values when you change a name. Now there is one significant exception to this rule: Unicode values in the Private Use Area are kept when the glyph name is changed.
Color Fonts
We have some great news for the color font makers among you. Firstly, Glyphs now imports SVG tables from compiled fonts.
Then, we have three new custom parameters in File > Font Info > Instances:
Color Palette for CPAL
In a CPAL/COLR setup, you can specify a color palette for this specific instance that is different from what is set in the Masters tab of Font Info.Color Palette for SVG
If you create an SVG font from a CPAL/COLR setup (See ‘Option B’ in the SVG tutorial), you can change the color palette for this specific instance.SBIX to SVG
If this parameters is present, Glyphs will build an SVG table from your Apple iColor layers. In other words, if you have built an sbix font, you can now also export it as an OpenType SVG color font. As its value, you need to specify which of the sbix sizes to use, e.g.,24for convertingiColor 24to SVG. Read more about it in the updated SVG Color Font tutorial.
OpenType Features
Both OpenType feature import and export is more performant, stable and mistake-tolerant. Most notably empty lookups are treated gracefully, very long feature code scrolls much faster, syntax coloring has been improved, and when opening existing fonts, Glyphs tries to reverse-engineer as much of the binary GDEF, GPOS and GSUB tables into legible feature code as possible.
Remember what a prefix is? It is feature code that gets injected before class and feature definitions. That makes it an ideal place for class and lookup definitions. We have two new File > Font Info > Instances custom parameters for managing your prefix code at export time. Say hello to:
Replace Prefix
Lets you define new prefix code for an existing prefix. Start the parameter value with the name of the prefix, followed by a semicolon, then insert the new prefix code. The code will get swapped when the respective instance is exported.Remove Prefixes
Simply takes a list of prefix names, which will be suppressed at export time.
You can now add your own code to an automatically generated feature that is not displayed in File > Font Info > Features, like some positional features, take mark, mkmk or dist as an example. Here is how:
- With the plus button in the bottom left, add a feature, and give it the same four-letter tag as the feature you want to expand.
- You can prepend or append your code:
a. To prepend, add you code, followed by this line:
# Automatic Code Start
b. To append, add this line, followed by your code:
# Automatic Code End
Cool. To check if it has worked as expected, you can export and then take a peek in the Temp folder. Now it is easy to add your own lookups or lookup calls to GPOS features, while still maintaining the advantage of interpolated positioning rules.
But wait, there’s more news about automatic feature code:
-
Ligatures are treated slightly differently now. If you have both
f_iandfiin your font, the ‘real’ ligaturef_iwill be preferred over the legacy compatibility glyphfifor building theligafeature. -
And you can have number ligatures now, like
one_two_three. You may have to set its subcategory by switching to the Font tab (Cmd-Opt-1), selecting the ligature glyph, and choosing Edit > Info for Selection (Cmd-Opt-I). -
Good news for people who build CJK and CJKV fonts: The alternate width features can now easily be automated! Like almost all automated GPOS code, they will not show up as separate entries in File > Font Info > Features but rather generated at export time. Here is how to trigger their creation:
halt(Alternate Half Widths)
Add an anchor calledHALTto the glyph layer.palt(Proportional Alternate Widths)
Add two anchors calledLSBandRSBto indicate alternate left and right sidebearings. Only if both anchors are present, the feature will be triggered for the glyph in question.vhal(Alternate Vertical Half Metrics)
Add an anchor calledVHAL.vpal(Proportional Alternate Vertical Metrics)
Add two anchors calledTSBand `BSB to indicate alternate top and bottom sidebearings. Only if both anchors are present, the feature will be triggered for the glyph in question.
Adding the respective anchors will indicate the alternate metrics in the glyph right away:

PostScript Hinting
There even is news for PS hinting in Glyphs. For one thing, you can set all the Blue Values not only per master, but also on an instance level. This means two things: Firstly, Glyphs now officially supports blueFuzz, which extends all alignment zones into both directions by the amount of units specified:

And secondly, you can now also employ the custom parameters blueScale, blueShift, and blueFuzz in File > Font Info > Instances. Thus, you can have different Blue Values for each font you are exporting from a .glyphs file. If there is someone you want to pat on the back for this, please give Tim Ahrens a hug, because it is his continued input in these matters that helps us add these features.
Again, many little things were improved. Special thanks to Jens Kutílek.
Python, Plug-ins, Scripts and Extensions
The Macro Window has two new cool features: firstly, you can now have tabs, and store multiple code snippets. Secondly, we implemented a help button in the lower left corner of the window, which takes you straight to the Glyphs API documentation when pressed:

If you run into problems while running the app, you can hold down both the Option and Shift key while starting the app. This will disable plug-ins. If your problems are gone, you know that one of the third-party plug-ins is the culprit. Speaking of plug-in troubles: Glyphs is now smarter in recognizing and preventing crashes caused by plug-ins. It will display a detailed error dialog. Glyphs will also warn you about slow plug-ins at start-up. For the most part, reported plug-ins are inefficient when importing modules and delay the app start.
In case you have been using objectsGS.py in your Scripts folder: You do not need it anymore, because we moved it somewhere into the guts of the app bundle.
Again, the one and only Yanone has further improved the app’s Python wrapper. Too many improvements to mention them all, so I will just pick out a few of my favorites:
- The
GSPath.applyTransform()method provides a convenient way to distort a singleGSPathobject with the familiar six-number transformation matrix. Example for the Macro Window:Layer.paths[0].applyTransform((1.1,0,1,0.9,0.1,0))will distort the first path of the current layer. - Tabs now have a
viewPortattribute, an NSRect describing the visible part of the canvas. Example for the Macro window:Font.currentTab.viewPort=NSRect(origin=NSPoint(-100,-200), size=NSSize(500,500))will zoom the view of the current tab. - We added
fontFilePathandinstanceto the font export notification. If you know what that means, you’ll love it. If you don’t, don’t worry, I’ll explain this in an upcoming tutorial. - Add
self.blackproperty to the plugin wrapper, for drawing in the Preview area when the user has inverted it to white-on-black. - The
GSFeatureclass now has a boolean property calledactive. - You can now add your own stuff to the
userDataproperty ofGSComponentobjects. It is adict, so you can do stuff like:
Layer.components[0].userData["centerPosition"] = NSPoint(450,200).
New Settings
We have some new secret settings for the true geeks among you. Here they are, complete with code samples:
Glyphs.defaults["drawShadowAccents"] = FalseThe drawShadowAccents setting toggles the display of the mark cloud. The mark cloud has proven to be very useful for most users, but sometimes it is in the way. In those cases, you now have the option to turn it off.
Glyphs.defaults["GSShowVersionNumberInTitleBar"] = TrueThis turns on the display of the app version number in the top right corner of the window. This can be useful if you find yourself switching between two app versions a lot, e.g., between the stable and the beta version, etc.:

To restore the default settings, simply del the preferences:
del Glyphs.defaults["drawShadowAccents"]
del Glyphs.defaults["GSShowVersionNumberInTitleBar"]
Spacing & Kerning
The kerning window has received some love and attention. Perhaps you have been using the File > Export > Metrics for exporting spacing and kerning info into a human-readable .metrics file:

Now, we are reusing the .metrics file syntax for the clipboard when you copy or paste kernig info in Window > Kerning (Cmd-Opt-K). Try it yourself: Select and copy some kerning and paste it in a text editor, and you’ll get something like this:
@MMK_L_A;@MMK_R_O;-15
@MMK_L_A;@MMK_R_R;-10
@MMK_L_A;@MMK_R_U;-15
@MMK_L_A;@MMK_R_T;-35
@MMK_L_A;@MMK_R_W;-25
The cool thing about it: .metrics syntax is not only easy to read, but also easy to parse, and easy to generate. So it will be a snap to write your own kern tools that can run independently of Glyphs.
-
Window > Kerning (Cmd-Opt-K) now allows filtering for groups or glyph kerning without a search string. Just pick the option from the magnifying glass icon:
-
Performance and handling of a lot of kerning exceptions (like 20,000 pairs and more) is greatly improved.
-
Searching in Window > Kerning (Cmd-Opt-K) is much improved.
-
Glyph > Update Metrics for All Masters now updates Brace and Bracket layers, too.
-
Newly added kerning pairs are sorted right away now.

UFO
For the folks among you that integrate Glyphs into a UFO workflow, we have some news for you as well. First of all, we have a new option in File > Export > UFO aptly named Decompose Smart Stuff:

What it does is simple: it decomposes corner components, white overlaps, smart components, etc., basically all the nifty smart features that third-party UFO tools cannot handle. That is especially useful if you want to rework, e.g., kerning in an external tool, because corners or white overlaps could jeopardize the sidebearing calculation.
And a handful of small improvements made their way into version 2.5:
- A handful of minor issues were resolved: glyphOrder, fsType, unicodeRanges, codePageRanges are stored properly now.
- Support for UFO3 is improved.
- Round-tripping UFOs is much improved.
Languages and Scripts
Thanks to our great users, we were able to update and improve many sidebar entries in the Font tab. To name just a few: Arabic, Cham, Coptic, Cyrillic, Ethiopic, Greek, Khmer, Tamil, Thai, and Tham. This often goes along with improvements of the internal glyph database (a.k.a. Glyph Data), to which we have added several new scripts: Glagolitic, Chakma, Avestan, Archaic Sinhala and Bamum, to name just a few. Many thanks to Gayaneh Bagdasaryan, Ειρήνη Βλάχου, Ben Mitchell, Muthu Nedumaran, Ilya Ruderman, Kyrylo Tkachov, Alexey Vanyashin, and the many others who have contributed.
Speaking of South Asian scripts: If you have not seen Mota Italic’s Devanagari Tutorial, you should definitely take a peek.
While we were at it, we improved OpenType feature support for many scripts, including Arabic, many South Asian and South-East Asian scripts.
Among the many improved and updated app localizations: Chinese and Korean. Even some of our tutorials are available in Chinese now. Many thanks to Liu Zhao and her students for the Chinese translations, and Joon-seok for the Korean localization.
- We added many IPA entries to GlyphData.
- Handle custom positional features for Indic script (dist, abvm, blwm).
- We removed combining strokes and slashes from default Latin sidebar entries.
- In South Asian scripts, the
shoulderHeight, or if not available,x-heightis used for positioning vertically flipped, auto-aligned components. - Improved Adobe-Korean1 mapping file.
- Further improved automatic feature code for Devanagari.
- Improved conjunct placeholders:

Printing
You asked for more options in the Print dialog, you got them! When you are printing from Font view, you now have checkboxes for Show Names, Show Color Labels, and Show Notes:

I hope the options are self-explanatory enough. If not, just try them and you’ll see.
More Improvements
In other news, literally hundreds of little things have been improved, fixed or altered for the better. Too small to warrant much talk about them, but they nevertheless un-complicate our daily type designer life. Here are just a few in a quick list:
-
In the .glyphsProject window, instance settings have been moved to the main view rather than hiding them behind the gear button, which makes batch editing much easier:
-
Glyphs supports the OS/2 table entries strikeout position and strikeout size with the custom parameters
strikeoutPositionandstrikeoutSizein File > Font Info > Masters. -
Clicking on the short ‘Successfully exported…’ notification takes you to the respective export folder in Finder.
-
The instance parameter
Instance Preview, which controls the preview glyphs displayed at the bottom of the Font Info > Instances tab, is now also available in File > Font Info > Font. That way, you only have to set it once. -
Outdated-beta warning dialogs now contain an Update button so you can immediately download the latest cutting edge version.
-
Glyphs now shows a warning when you are opening a file that was built in a different app version.
-
Glyphs now does a much better job at recovering corrupted files – as far as the respective data corruption allows, of course.
-
Images are now excluded from transformations when they are locked.
-
Improved SVG import (in particular, better support for
arc). -
The Autostroke option in Filter > Offset Path is much improved.
-
Improved export of Apple color fonts (
sbix) with a lot of images. -
The previews in Font view and Font Info try to show effects of third-party filters in custom parameters as well.
-
We switched back to Lucida Grande for small text in Edit view, which, among other things, preserves text in PDFs created through the Print dialog.
-
And Filip Zajac has updated the online help inside the app! Give it a go by clicking on one of the question mark buttons.
-
You can now have sidebar entries just for specific .glyphs files. Here is how: Create a .plist file (based on the
CustomFilter.plistin the Glyphs Application Support folder), call itCustomFilter, followed by a custom name, and the.plistsuffix, e.g.,CustomFilter BigProject.plist. Then, place it next to the .glyphs file. Next time you open the font, you will see an extra list of smart filters and list filters. Very handy for managing your glyph sets for specific projects:


And as always, many little bug fixes, performance and stability improvements made it into Glyphs 2.5. Many thanks to our users who reported issues. Special shout-out to Kalapi, Jens, Claus, Wei and Jan.


