Reusing shapes: corner components
Corner components are pretty much like magic for creating serifs. And not only serifs.
Corner components are shapelets you can attach to corner nodes. Perfect for serifs, they also lend themselves for rounded corners or inktraps, and are a great way to keep these partial shapes in sync across many glyphs. Best of all, they interpolate and export in variable fonts. Take this n, for example:

All of the serifs are corner components, which, in Glyphs 3 and later, are represented as blue particles:

Build corner components
All we need for this is two new glyphs with special naming: A corner component must start with _corner and have an arbitrary dot suffix. The underscore at the beginning of the name ensures that the glyph will be created as non-exporting. Add two new glyphs, and call them, for example, _corner.leftSerif for the left serif, and _corner.rightSerif for the right serif. The best way to do this is invoking the menu command Glyph > Add Glyphs (Cmd-Shift-G), typing _corner.leftSerif _corner.rightSerif, and pressing the Generate button.
But let’s begin with drawing a serif. Our left serif could look like this:

As you can see, the serif is an open path that start vertically, winds counter-clockwise (just like your closed paths), and the last part is on the baseline. The final point in the bottom right needs to be a bit to the right in respect to the first point. The initial vertical movement and the final horizontal movement complement each other to a perpendicular shape corner.
There are also three anchors. You can add the default anchors left, right and origin with Glyph > Set Anchors (Cmd-U) or Set Anchors for all Masters (Cmd-Opt-U):

The origin anchor represents the corner of the host path (onto which the corner component will be injected later). If you do not have this anchor, you need to move the serif over the left sidebearing, and make sure it winds around the origin point (x=0, y=0), where the baseline meets the left sidebearing.
The left and right anchors are the pivotal points for optical adjustments on non-perpendicular corners. More about that later.
Add corner components
Now, how do we get our serifs to stick to our glyphs? Easy. Go to your glyph, made of paths and select a corner node, then right-click on it to open the drop-down menu, and select Add Corner Component:

In the dialog that follows, select _corner.leftSerif, and voilà, your serif gets injected into the path! Coolio.

For the other corners you can select and copy the corner, select the target node, and paste. Or add again through the context menu.
But, oops, what happened here:

Well, it is a left serif, and that is how a left serif fits on a right corner. But don’t despair, because you can select the malrotated serifs and mirror them with one of the mirror buttons in the Transformations panel:

Of course, that is only an option if the design of your serif lends itself to mirroring in the first place. If that is not the case, you may need a _corner.rightSerif, and arrange the anchors like this:

The right anchor is close to the end of the path, the left anchor on the initial segment. Again, take note of the path direction: counter-clockwise, like most other paths.
Diagonal stems
Corner on diagonal stems are adjusted automatically, by slanting the outermost segment of the corner component into the angle of the stem:

Your corner component was drawn perpendicularly, but the two segments in the corner of the v are not perpendicular. So the question is, which segment will the corner component align to, and which segment will it distort into. Glyphs often guesses right, but not always. In that case, you can adjust the alignment manually, with the four little buttons in the grey info box (Cmd-Shift-I):

- left arrow: alignment for left serifs or mirrored right serifs. The beginning of the corner component path gets slanted into the angle of the host path, the end of the path stays straight.
- right arrow: alignment for right serifs or mirrored left serifs. The end of the corner component path gets slanted into the angle of the host path, the beginning of the path stays straight
- double arrow: the corner component is fitted half way between incoming and outgoing path segment; best for inktraps. Bending will be done along both, the beginning and the end of the corner component path, along the three anchors, with the origin anchor as pivot.
- x: no alignment, the corner component is forced in as is. For special cases only, will typically give you funny results.
So, one side of the corner component will be aligned, the other will be bent into the diagonal. Can we control how? Yes, we can! With the position of the left or right anchor, respectively:

The anchor serves as pivotal point. Effectively, you get more optical correction the more you move the anchor away from the origin anchor. Your mileage may vary.
Scale corner components
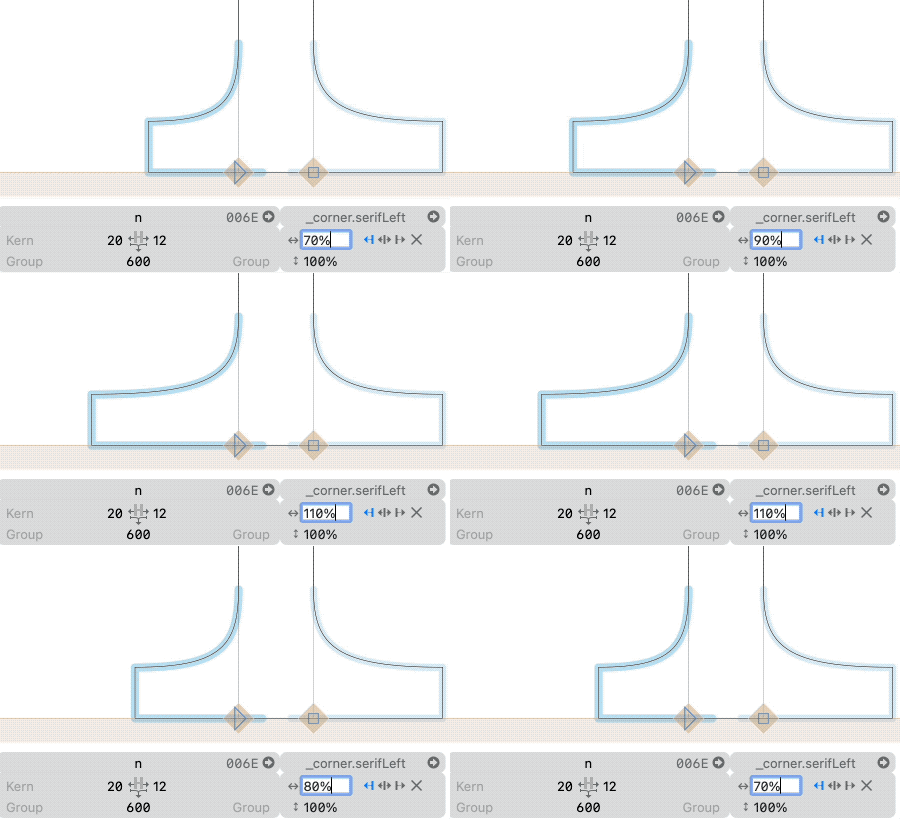
With slab serifs, you can easily change the scale. Simply write another percentage for the horizontal or vertical scale. Or even better, place your cursor in the scale field, and use the up and down arrows on your keyboard to change the value. Add Shift for increments of 10, Cmd for increments of 100:

But you also see the problem we have here: the corner component gets distorted with a simple scale. The rounding changes its character, and bracketed serifs will suffer when you scale them. Bummer. We would need something like interpolation for a better result… wait… we can actually do just that. Read on.
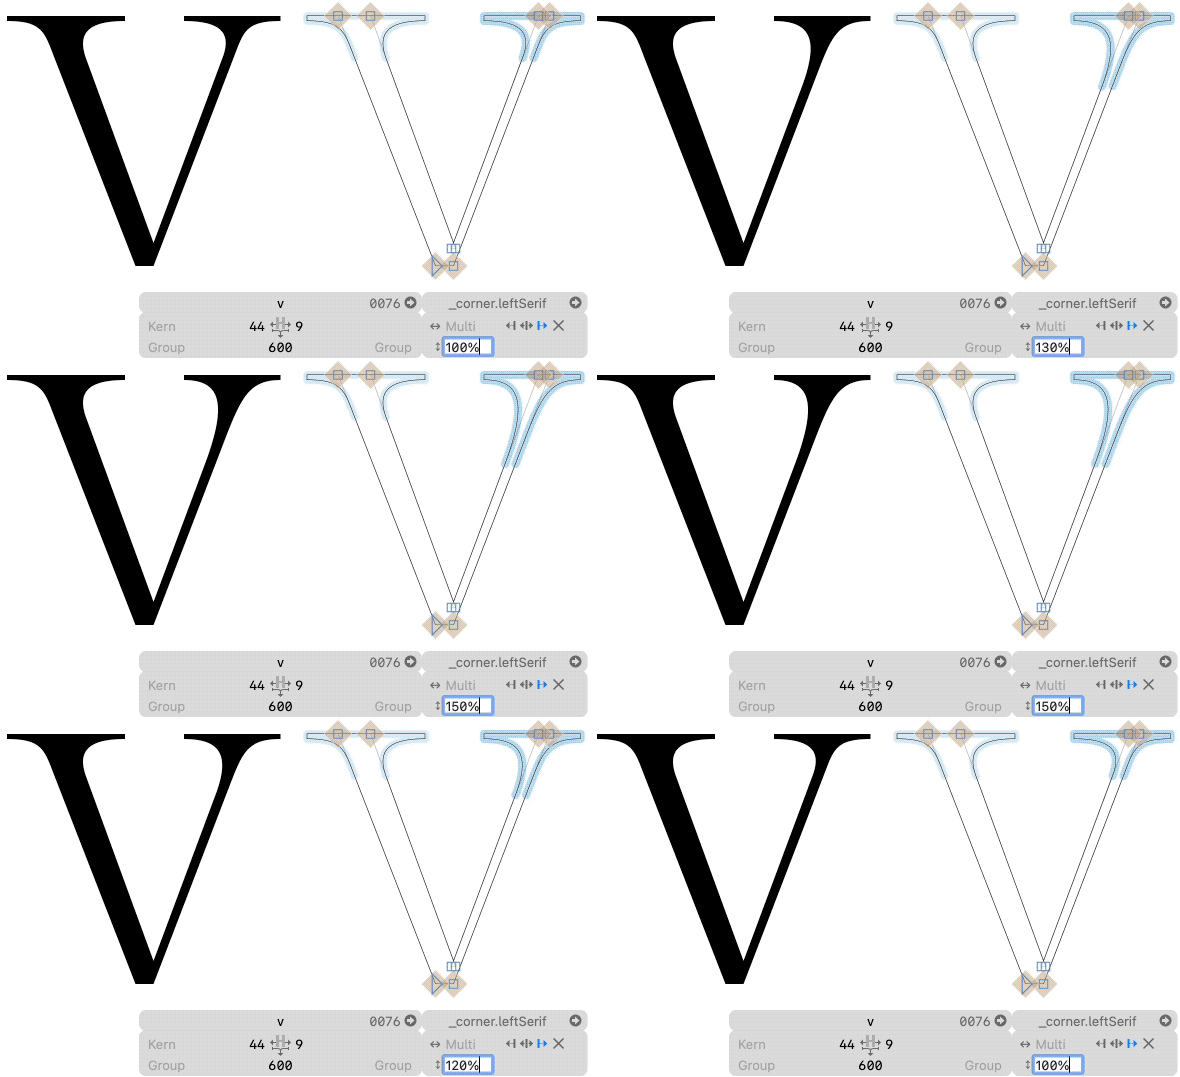
Go back to your corner component. In the Layers panel, duplicate the master layer, then right click on the layer copy to bring up its context menu, and redefine it as Intermediate. Assuming that the master layer has a scale of 100% horizontally and 100% vertically, define the intermediate layer as 150% width and 100% height:

And now draw a widened serif, the way it is supposed to look like. Adjust the curvature accordingly, perhaps you want to keep a certain angle the same, whatever is required for your design. In my case, it is a bit more simple:

So now, when you enter a different scale percentage, the serif gets interpolated properly:

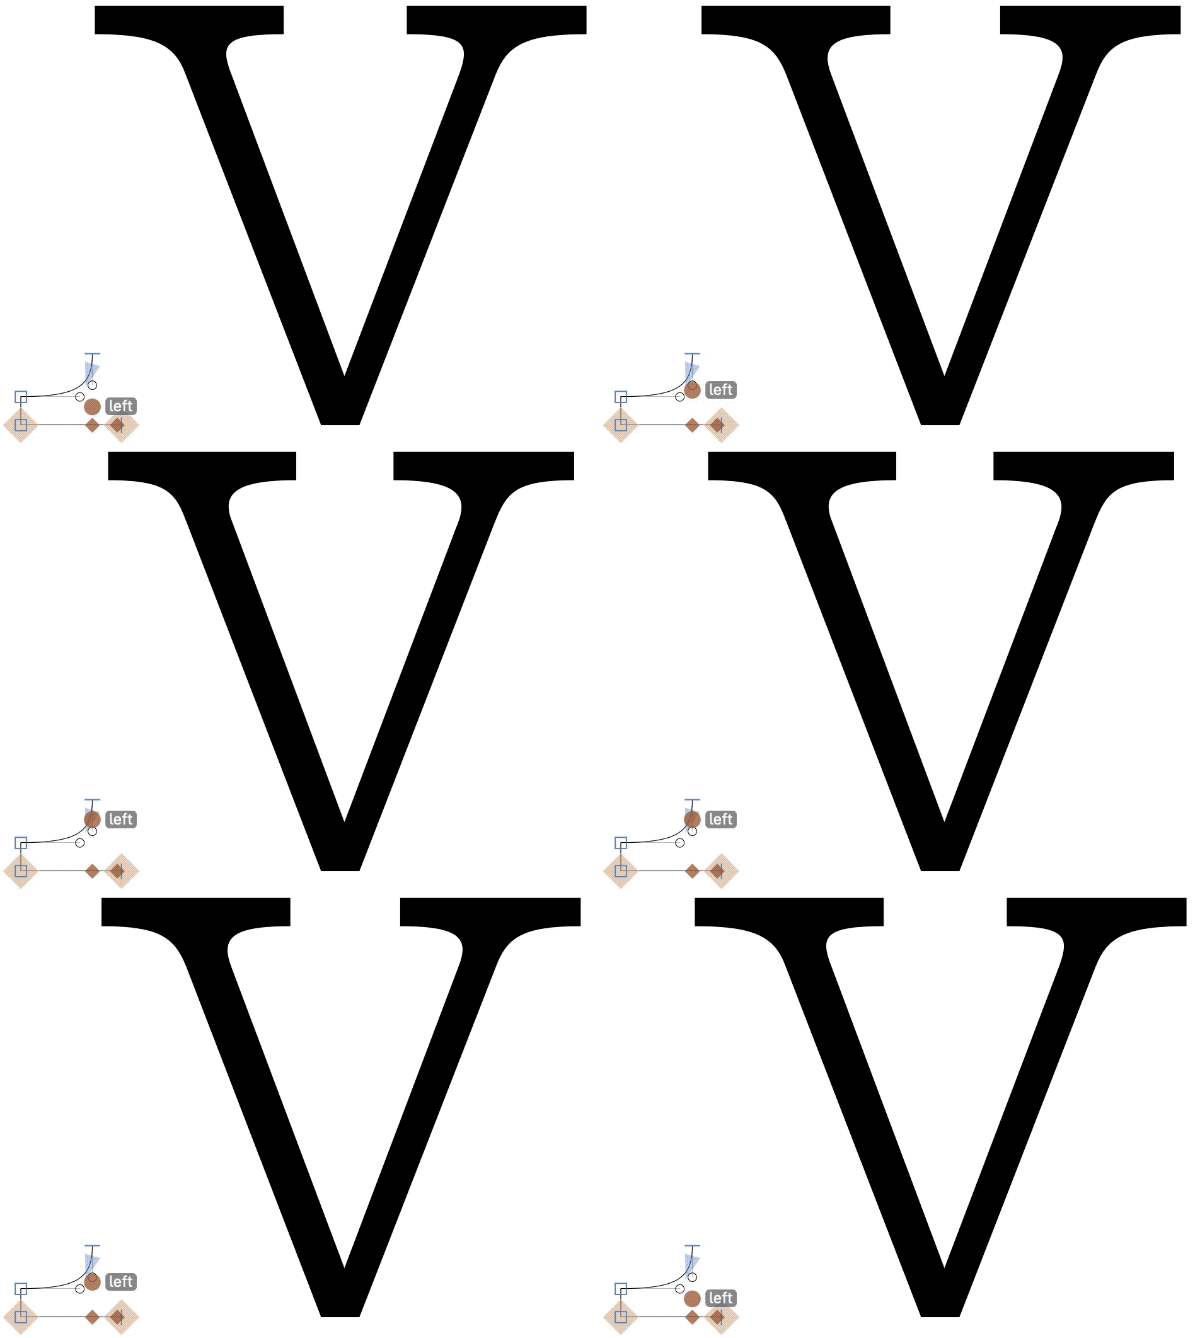
Or, add an Intermediate at 150% height, 100% width, and you can scale your serifs vertically without losing the serif thickness, e.g., in the classic example of the right serifs of a high-contrast V:

Inktraps
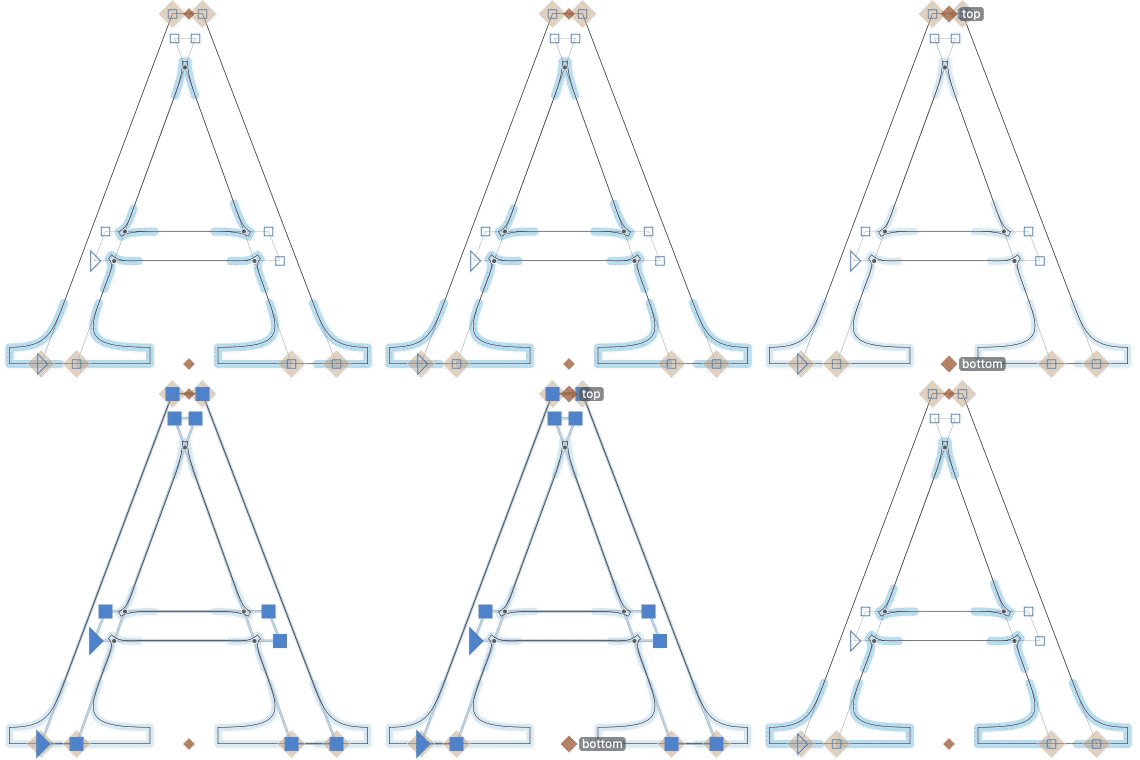
For inktraps, make sure that end points, handles and left & right anchors are aligned towards the origin anchor. Sounds complicated? Fair enough, here is a picture that says more than a thousand words:

I added guides for clarity. If you leave out left and right anchors, then the origin anchor will be the pivot. Experiment with the positions of points and anchors along the guides. Again, take note of the path direction. You see, the arrangement of points and anchors does not necessarily need to be vertical and horizontal. The relation between points and anchors is what counts.
For the next step, keep in mind that corner components also work on ‘extra nodes’, the predicted intersection points between two paths. This makes inktraps possible without removing overlaps. To do that, first make sure you turn on View > Show Nodes > Show Extra Nodes:

Select them by Shift-clicking each one of them. Then, again, add corner components from the context menu. Then, experiment with alignments and scales for each corner component:

And the best thing: you can still move the crossbar up and down, and keep your inktraps aligned properly!
Complex corner components
You can add any number of closed paths in a _corner glyph to compliment the open corner path. Finally, time for the long overdue return of the page curl:

Path directions of closed paths will be preserved when mirrored.
Tips
Sometimes, even corner components hit a ceiling in their flexibility. Then you need to decompose in order to make individual adjustments. Select one or more corner components by (Shift-)clicking on their blue line, then choose Decompose Corner Component from the context menu, and you are all set. See the Decompose Corner Components script below for batch decomposition.
You can navigate between _corner glyphs and the glyphs that contain them. Select a placed corner component and click on the little circled arrow in the grey info box, next to the name of the corner component, to open the _corner component:

While we’re here, click on the name directly to replace the corner component. Just like you would do with a regular component.
Inside a _corner glyph, you can choose Show all glyphs that use this glyph as a component from the context menu:

Access all corner components at once by repeatedly pressing Cmd-A for selecting all:

In this case, Select All cycles through: all paths, all paths and anchors, all corner components, all anchors. Once you reach all corner components, you can convenietly get rid of all of them at once by pressing the Delete key.
In a _cornerglyph, you do not necessarily need to keep your first or final path point beyond the pivot anchors. For instance, this is how you can do the top serif in the n:

Once inserted, the missing segment will be completed automatically:

Useful scripts
In the mekkablue scripts, there are a few scripts for corner (and cap) components:
- Propagate Corner Components: will apply the corner component setup of the current master to all other compatible layers in selected glyphs. This way you only have to set up your components once, then run the script. Also useful for keeping a glyph with corner components compatible for interpolation.
- Remove Detached Corners: sometimes it happens that a corner component is not attached to a node anymore. This script finds those situations, reports them in the macro window, and removes orphaned corner components.
- Find and Replace Corner and Cap Components and Find and Replace Corner and Cap Components at Certain Angles: will give you a user interface for batch-replacing corner components.
- Decompose Corner and Cap Components allows you to batch-decompose corner components in many glyphs at once.
Update 2022-07-26: updated title, related articles, minor formatting.
Update 2023-07-07: rewrite for Glyphs 3.2.


